Applying a Car Paint Shader

You can apply a car paint shader to an object.


Before you begin: Make sure you select a product with a material already applied to it.

For more information on how to create materials refer to Creating Materials in the Material Editor User's Guide.

Related Topics
About the External Shader Files
Mapping Types
Advanced Materials Parameters
  1. Right-click the material behavior in the specification tree then select xxx_Rendering object > Definition to display the Rendering Properties dialog box.

  2. Select the Texture tab then select Car Paint in the Type list.

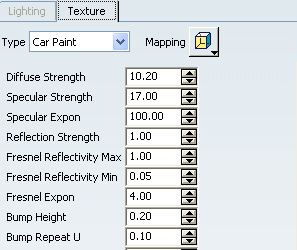
    This shader gives a metallic texture with reflective-particle effects to your model.

    Important:
    • You can use a Mapping Types with the Car Paint Shader but keep in mind that the rendering is relevant for real time display only. It has no impact when computing the rendered image.
    • When materials are not applied yet, the shader parameters are not visible. The preview is not updated.

  3. To modify the size of the particles appearing on the shader, click the arrows of the Material Size box up or down until you get the effect desired.

    Material size: 200mm Material size: 500mm

  4. To modify a Car Paint Color, click the corresponding square button.

  5. Select the desired color from the Color chooser.

    Warning:
    • Before you use the Car Paint Shader you need to load the About the External Shader Files provided in Catia to get the whole visual effect.
    • A warning message appears when switching from a Car Paint to an External Shader to inform you that all your data will be lost.

  6. Click OK when satisfied with your parameters.

The two images below compare the different results you can obtain using a standard texture and an advanced shader of type Car Paint:

Rendered image with standard texture

Rendered image with Car Paint shader

Tip: Select View > Rendered Style > Shading and Material option to have a better vision of the rendering effect.