About 3D Textures | ||
| ||
Mapping types
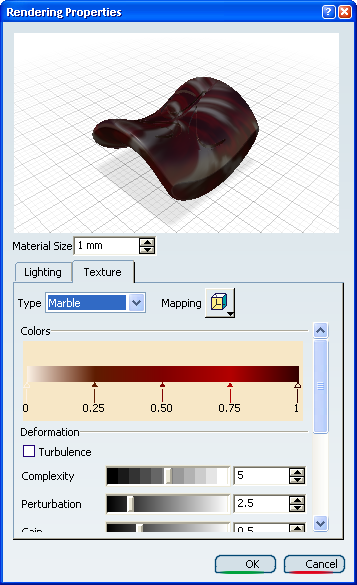
When accessing the Texture tab in the selected 3D texture rendering properties, you can choose among six mapping types by clicking in the Type box :
 |
The available mapping types are:
 |
Planar |
| Spherical | |
| Cylindrical | |
| Cubical | |
| Auto Adaptive | |
| Manual Adaptive |
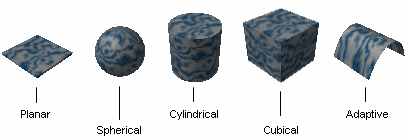 |
These different mapping types let you select the most appropriate mapping for the shape of the geometry and are used for real time display only:
- Planar Mapping: you can use it for planar geometries such as a slide projector (a picture on a wall, for instance) or for textures with two privileged directions such as a texture representing a chessboard or a wall of bricks.
- Spherical Mapping: you can use it for spherical geometries such as a painted light bulb or a ball, or for textures that do not have a privileged direction such as stone or raw metal.
- Cylindrical Mapping: you can use it for cylindrical geometries such as a can of food or a bottle, or for textures having a privileged direction such as shiny metal or marble.
- Cubical Mapping: you can use it for cubical geometries such as a box.
- Automatic Adaptive Mapping: automatically detects the mapping that best fits.
- Manual Adaptive Mapping: gathers together faces which
have close normal vectors. The precision value defined using the slider
modifies the tolerance used during the grouping process.

This manual mapping enables textures to cross slightly sharpen edges, thus providing higher visual quality.
This mapping type is especially relevant for materials with no specific orientation such as leather or wood for example.
![]()
Noise Parameters
Noise parameters compute a value that will be used to perturbate artificially the point coordinates (x, y, z).
Each point is associated to a color map. When you define a noise value ( )
for a given point (
)
for a given point ( ),
the resulting color will be the one of the perturbated point =
+
.
),
the resulting color will be the one of the perturbated point =
+
.
These parameters are defined in the texture properties and, more specifically, in the Deformation area.
When applying a Marble, Vein, Alternate Vein or Rock texture, the following parameters are available:
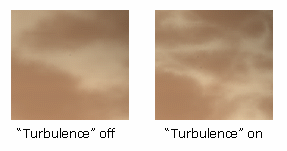
- Turbulence: enhances the effect of the second color.
Below are two pictures using the Rock texture as an example:
- Amplitude (for Vein and Alternate Vein textures only): coefficient applied to the values defined for Complexity, Perturbation and Gain. The greater the coefficient value, the more irregular the veins. This enables to give realism by increasing the number of details of textures. If set to 0, the veins are linear. Note that this parameter is available only when applying a Vein or Alternate Vein texture.
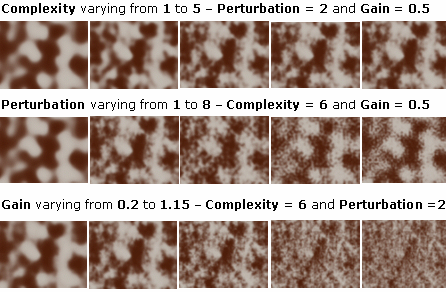
- Complexity: sum of the perturbations applied by the application. Setting this parameter to "1" means that the perturbation effect is applied once
- Perturbation: applies a kind of "rasterization" to the texture. This parameter is relevant only when used in combination with Complexity (i.e. Complexity value must be other than "0"). Perturbation parameter has a minor impact on final result
- Gain: applies a grainy effect to the texture. This parameter must be used in combination with Complexity and Perturbation. You can choose values comprised between 0 and 1
- Attenuation: makes the color look more or less dark.
The following are samples of deformation applied to a Rock texture with different complexity, perturbation and gain values:
 |