Use the Rendering Options: Simple Workbench
You can use the rendering options through a simple workbench.
Select Rendering Options
 in the Render toolbar.
The Rendering Options dialog box opens:
Select the Quality. Note:
Three choices are available: Low, Medium or High quality. You can
define the quality of the rendering (anti-aliasing, reflections, refractions).
The better the quality is, the longer the Rendering time will be.
By using anti-aliasing, a technique that is based on shading the pixels
along the borders of the lines, using different tonalities of the same
color to average the geometry:
However, anti-aliasing is huge resource consumer: rendering
time can be doubled. In some cases, it might not be necessary to use
the maximum level of anti-aliasing.
Realistic
Lighting: when activated,
provides realistic soft shadowing. Surfaces not fully exposed are attenuated
so that they do not receive the full contribution of the ambient lighting.
When this option is activated, computing time is longer.
Resolution:
Select the Resolution. Note:
-
Window: uses the same resolution
as the 3D window (one pixel in the 3D gives one rendered
pixel).
-
DPI: applies a user-defined ratio
(one pixel in the 3D gives more than one rendered pixel).
The ratio is given in pixels per unit length. This allows
to have images larger than the screen resolution.
Set these options according to your needs.
Click OK to validate your settings and quit
the Rendering Options dialog box.

Use the Rendering Options: Exhaustive Workbench
You can use the rendering options through an exhaustive workbench.
Click Rendering Options
in the Render toolbar.
By default the Rendering Options dialog box opens:
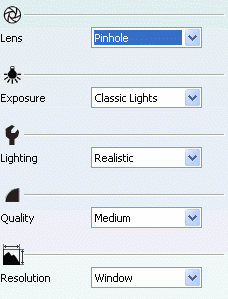
Select predefined settings from the lists.
- Lens: Pinhole, 15mm, 20mm, 24mm,
28mm, 35mm, 50mm, 85mm, 135mm, 200mm or Custom.
- Exposure: Classic Lights, Sunny, Cloudy, Indoor,
Moonlight, Custom.
- Lighting: Simple, Realistic,
Caustics, Dispersion, Custom.
- Quality: Low, Medium, High, Very
High, Custom.
- Resolution: Window, Window DPI,
TV (640x480), HDTV (1920x1080), A4, A3, Letter Legal, 10x15cm/4x6in,
13x19cm/5x7.5 in, 15x23/8x12 in, 30x46cm/12x18in, Custom.
See About Rendering Options to define the settings according to
your specific needs if the predefined ones do not meet the result expected.
Click OK when satisfied.
|