About Rendering Options | ||
| ||
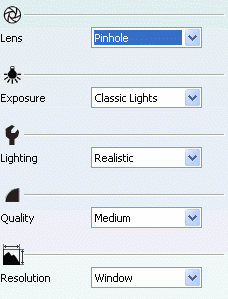
Lens
- Lens List
- You can choose one of the Using Rendering Options as lens type from the list.
-
You can also choose the Custom option to customize the lens according to your needs. Therefore, the lens frame becomes dynamic, you can set the following parameters:
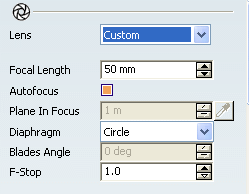
- Focal Length
- The value chosen by using the Up or Down arrows defines the focal length of the lens.
- Focus
-
The following options help you to define the focus of the lens.
- Autofocus
- The focus is screen centered when the option is activated.
- Plane in Focus
-
The value chosen by using the Up or Down arrows
helps you to define the distance of plane in focus.
Important: This option is only available if Autofocus is not activated. -
Selector

-
The option lets you define manually the focus.
Important: This option is only available if Autofocus is not activated.
- Diaphragm List
The following options help you to define the diaphragm of the lens.
- Circle
Note: This option is set as default value for the option.
- 5 blades
- 6 blades
- 7 blades
- 8 blades.
- Circle
- Blades angle
- The value chosen by using the Up and Down arrows helps you to define the position of the blades.
Important: You can only select a value if you chose 5, 6, 7 or 8 blades for the diaphragm. - F-Stop
- The value chosen by using the Up and Down arrows helps you to define the diaphragm aperture.
![]()
Exposure
- Exposure List
- You can choose one of the Using Rendering Options as exposure type from the list.
Note that in some cases, when you change the type of exposure the screen can turn black. For example, if you choose the Classic Light exposure and then change to the Sunny exposure, the screen turns black. This is a normal behavior because the camera is set for indoor pictures and will thus be under-exposed.
You can also choose the Custom option to customize the exposure according to your needs. Therefore, the exposure frame becomes dynamic, you can set the following parameters:
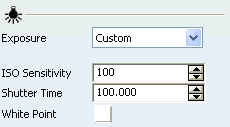
- Iso Sensitivity
- The value chosen by using the Up and Down arrows helps you to define the ISO sensitivity.
- Shutter Time
- The value chosen by using the Up and Down arrows helps you to define the Shutter Time.
- White Point
Click
 to choose a color.
![]()
Lighting
- Lighting List
- You can choose one of the Using Rendering Options as lighting type from the list.
-
You can also choose the Custom option to customize the lighting according to your needs. Therefore, the lighting frame becomes dynamic, you can set the following parameters:
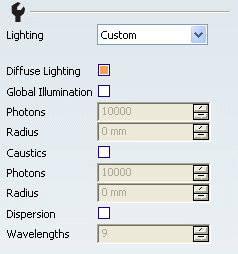
- Diffuse Lighting
- Selecting this option enables you to have a rendering with a diffuse lighting.
- Global Illumination
-
When activating this option, the following ones are available:
- Photons: Using the Up or Down arrows helps you to define the photons for the global illumination.
- Radius: Using the Up or Down arrows helps you to define the radius for the global illumination.
- Caustics
-
When activating this option, the following ones are available:
- Photons: Using the Up or Down arrows helps you to define the photons for the caustics.
- Radius: Using the Up or Down arrows helps you to define the radius for the caustics.
- Dispersion
-
When activating this option, the following one is available:
- Wavelengths: Using the Up or Down arrows helps you to define the wavelengths for the dispersion.
- Radius: Using the Up or Down arrows helps you to define the radius for the caustics.
![]()
Quality
- Quality List
- You can choose one of the Using Rendering Options as quality type from the list.
-
You can also choose the Custom option to customize the quality according to your needs. Therefore, the quality frame becomes dynamic, you can set the following parameters:
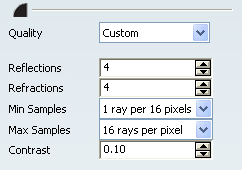
- Reflections
- The value chosen by using the Up and Down arrows helps you to define the reflection depth for the quality.
- Refractions
- The value chosen by using the Up and Down arrows helps you to define the refraction depth for the quality.
- Min Samples
- The value chosen by using the Up and Down arrows helps you to define the anti-aliasing min samples for the quality.
- Max Samples
- The value chosen by using the Up and Down arrows helps you to define the anti-aliasing max samples for the quality.
- Contrast
- The value chosen by using the Up and Down arrows helps you to define the anti-aliasing contrast for the quality.
![]()
Resolution
- Resolution List
- You can choose one of the Using Rendering Options as resolution type from the list.
-
You can also choose the Custom option to customize the resolution according to your needs. Therefore, the resolution frame becomes dynamic, you can set the following parameters:
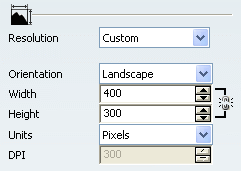
- Orientation
-
The following options help you to define the layout for the resolution.
- Portrait
- The resolution is of a portrait format.
- Landscape
- The resolution is of a landscape format.
- Width
- The value chosen by using the Up and Down arrows helps you to define the width for the resolution.
- Height
-
The value chosen by using the Up and Down arrows helps you to define the height for the resolution.
Tips: - If the Keep Image Ratio is open
 , you can change the width and the height values independently. The image ratio is not kept
 - If the Keep Image Ratio is closed
 , the values you give to the width or the height parameters change simultaneously in order to keep the image ratio.
- If the Keep Image Ratio is open
- Units
-
You can choose one of the following options as the unit for the resolution:
- Pixels
Note: This option is set as default value for the option.
- cm
- mm
- Inches
- Pixels
- DPI
-
The value chosen by using the Up and Down arrows helps you to define the DPI for the resolution.
Important: This option is not available when Pixels is chosen as the unit for the resolution.