Managing Ordered Geometrical Sets | ||||||
|
| |||||
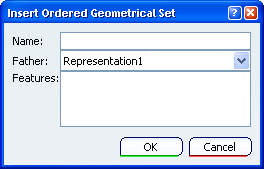
Insert an Ordered Geometrical Set
You can insert an ordered geometrical set in the specification tree.
Select Insert > Ordered Geometrical Set... from the menu bar.
The Insert Ordered Geometrical Set dialog box is displayed.
The Features list displays the elements to be contained in the new ordered geometrical set.
Important:
|
| Warning: You cannot create an ordered geometrical set within a geometrical set and vice versa. |
![]()
Remove an Ordered Geometrical Set
You can remove an ordered geometrical set from the specification tree.
- Right-click the ordered geometrical set then select
the Delete contextual command.
The ordered geometrical set and all its contents are deleted.
![]()
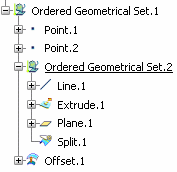
Remove a Feature within an Ordered Geometrical Set
You can remove a feature within an ordered geometrical set.
- Right-click the feature then select the Delete
contextual command.
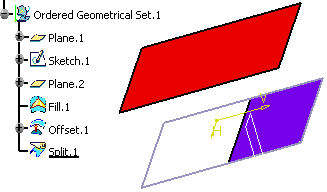
- Deletion of a modification feature: the system reroutes the
children on the element that is modified. Therefore the deleted
feature will be replaced by the modified feature of upper level.
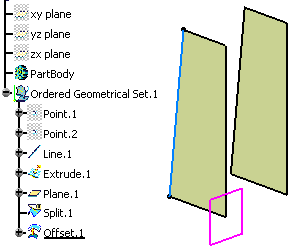
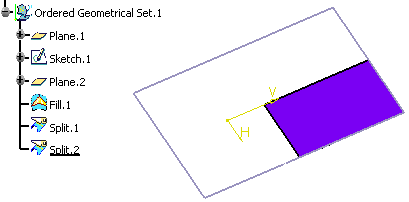
In our scenario, Split.1 is deleted. As a consequence, Offset.1
now points Extrude.1.
-
Deletion of a creation feature: no reroute is possible.
- Deletion of a modification feature: the system reroutes the
children on the element that is modified. Therefore the deleted
feature will be replaced by the modified feature of upper level.
In our scenario, Split.1 is deleted. As a consequence, Offset.1
now points Extrude.1.
![]()
Sort the Contents of an Ordered Geometrical Set
You may need to sort the contents of an ordered geometrical set, when the geometric elements no longer appear in the logical creation order. It may be the case if you enabled the selection of drawn or future geometry.
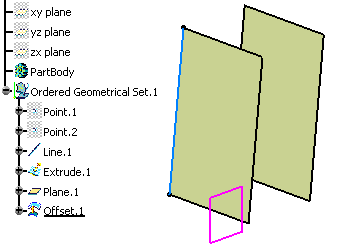
In that case, use the Auto-sort capability to reorder the ordered geometrical set contents in the specification tree. The ordered geometrical set contains a line based on two points lines. The specification tree looks like this:
- Right-click the Ordered Geometrical Set.1 from the specification
and choose the Ordered Geometrical Set.1 object > AutoSort
command.
Instantly, the contents of the Ordered Geometrical Set are reorganized to show the logical creation process.
The geometry remains unchanged. Datum features are put first in the specification tree.
![]()
Reorder Elements within an Ordered Geometrical Set
The reordering capability enables you to reorder elements inside the same ordered geometrical set.
Reorder a creation feature based upon a modification feature
You can reorder the creation feature based on the modification feature.
The Ordered Geometrical Set contains a split surface (in purple) that
split a filled surface by a white vertical plane, and an offset surface
(in red) that is an offset of the split surface.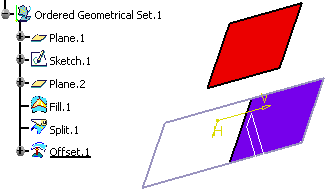
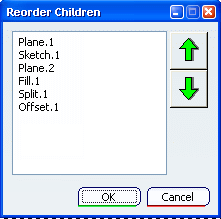
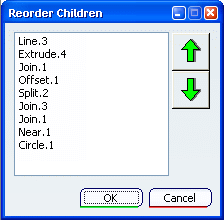
Right-click the Ordered Geometrical Set.1 from the specification tree and choose the Ordered Geometrical Set.1 object > Reorder Children command.
The Reorder Children dialog box is displayed.
Reorder a modification feature based upon a modification feature
You can reorder a feature based on the modification done.
The Ordered Geometrical Set contains a split surface (in blue) that splits another split surface by a vertical plane. The first split surface also splits a filled surface delimited by the sketch in purple.
| Warning: An error message is issued if you try to move an element towards a position that breaks the order rules. |
Tips:
|
Note:
Note that the feature defined
as the In Work Object after the Reorder operation is not affected
by this operation from an update point of view:
- when reordering upward, the feature located just before the new position of the reordered feature becomes the In Work object.
- when reordering downward, the feature just before the original position of the reordered feature becomes the In Work object.
![]()
Reorder Features
The reordering capability enables you to reorder elements inside the same ordered geometrical set.
Use the arrows to move an element up or down.
Warning:
|
![]()
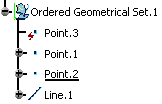
Modify Children
You can modify the contents of an ordered geometrical set by selecting its first and last component, as well as destroy it.
| Warning: This command is only available on sub-ordered geometrical sets. |
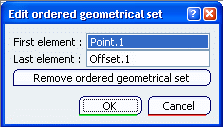
Right-click the sub-ordered geometrical set from the specification tree and choose the Ordered Geometrical Set.x object > Modify Children.
The Edit ordered geometrical set dialog box opens with the First element and Last element fields automatically valuated with the first and last elements of the ordered geometrical set.
Select the elements you wish to place first and last.
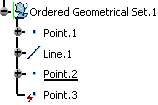
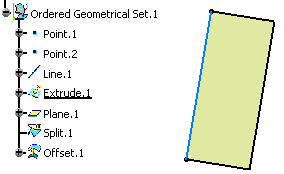
In our scenario, we chose Line.1 as the first element and Split.1 as the last element.
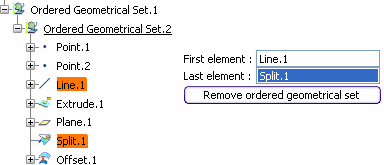
Click OK.
The specification tree is modified consequently. Elements before or after the first and last elements are rerouted in the father ordered geometrical set.
The Modify children command also allows you to remove the sub-ordered geometrical set. As a consequence, elements are rerouted in the father ordered geometrical set.
![]()
Replace Features
You can replace the feaures within the geometrical set.
This capability is only available on shape elements.
![]()
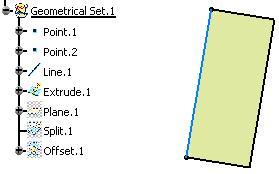
Switch from Ordered Geometrical Set to Geometrical Set
While in an ordered geometrical set environment, you may want to switch to a geometrical set environment (for instance, if you do not want to work in an ordered environment any more).
- Right-click the ordered geometrical set from the
specification tree and choose the Ordered Geometrical Set.1
object > Switch To Geometrical Set command.
The ordered geometrical set feature becomes a geometrical set (provided its name has been created automatically). and features after the current object that were not visualized in the ordered geometrical set are put in no show in the geometrical set.
Warning:
|
![]()
Edit Features within an Ordered Geometrical Set
A feature can be created within an OGS using different feature types (creation or modification) depending on the options selected to create it. If a feature is created as a modification feature, then when editing it, you are prevented from changing the options that were used to define its type.
Here is the list of commands whose options lead to a modification of the feature type:
Let's take an example with the corner feature.
The Corner Definition dialog box opens.
Select the Trim element 1 and Trim element 2 check boxes to trim and assemble the two reference elements to the corner. By selecting these options, the corner is now considered as a modification feature.
Double-click the corner (in the specification tree or in the 3D geometry) to edit it.
The Corner Definition dialog box opens.
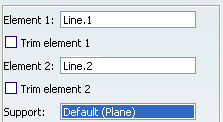
Both Trim options are disabled.