Adding and Retrieving Tool Elements to/from Catalogs

You can add tool elements to catalogs, or import them using several commands provided by Machine Programming. Tools elements can be tools, tool holders, or tool assemblies. The commands described below make sure the catalogs are customized for Machine Programming. Therefore, it is important that you use Send to Catalog (not the V6 catalog editor) to create the catalogs.

This task shows you how to:

Related Topics
Working with Generic Machine Editor

Add a Tool to a Catalog

You can send tool elements to catalogs.

  1. In the Machining Cell, right-click a tool, tool holder or tool assembly and select NC Resources > Send to Catalog in its contextual menu.

    The Send to catalog dialog box appears.

  2. To add the tool element to an existing catalog:

    1. Make sure Update an existing catalog is selected.
    2. Select a Catalog name from the list
    3. Click OK.
    4. Click OK in the information message box displayed at the end of the addition.

  3. To add the tool element into a new catalog:

    1. Make sure Create a new catalog is selected.
    2. Click OK.
    3. Enter the name of the new catalog in the dialog box that appears and click Finish.

      This name must be unique.

    4. Click OK in the information message box displayed at the end of the addition.

  4. If need be, click More...

    A Catalog Chooser dialog box appears to help you select one.

List and Import Tools

You can list and import tools.

  1. From any product:

    1. Select Start > Machining > Machine Programming.

      A PPR context with an empty Machining Cell is created. An empty Activities Process Tree opens automatically.

    2. Create a generic machine or assign a machine from the database.

      As soon as a machine is assigned to the Machining Cell, a Part Operation and a Manufacturing Program are created in the Activities Process Tree.

    3. Alternatively, open an existing Machining Process or PPR context .

      By default, the Activities Process Tree opens automatically.

  2. If the Tool Builder toolbar is not visible, select View > Toolbar > Tool Builder.

  3. Click Import/List Tools


  4. Enter your search criteria.

    1. Define the place where you want to search tools from the Look in list.
    2. Click the icon corresponding to the type of tool you are looking for.

      All the tools of this type are displayed in the dialog box.

    3. Add a name or a diameter to refine the search. Only the tools meeting these criteria are displayed.

  5. Filter those results:

    1. Either stay in the Simple search tab and enter a name or a diameter.
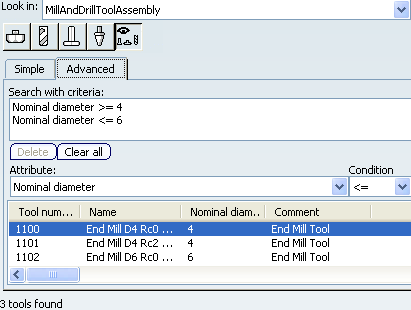
    2. or go to the Advanced Search tab, where you can enter search criteria based on Attribute, Condition, and Value.

      For example: Search for a tool with Nominal diameter between 4mm and 6mm in the MillAndDrillAssembly tool catalog.

  6. To check a tool, select its line in the dialog box.

    Its 2D representation is shown on the right of the dialog box. The representation is updated as you go from one tool to another.

  7. Select one or several tools to import.

  8. Click Cancel to close the dialog box without importing tools.

  9. Click Apply

    The tools are imported under Machining Cell, and the dialog box remains open to let you list or import more tools.

  10. Click OK.

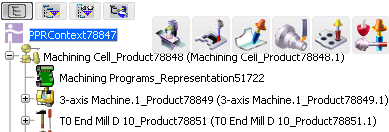
    The tools are imported under Machining Cell and the dialog box closes.

List and Import Tool Assemblies

You can list and import tool assemblies.

  • Proceed as for tools, but click Import/List Tool Assemblies .