- New tools
- Lists the tools available to compute a new
tool path on the portions with collision points. This means that:
- the tool used originally to compute the tool path is not listed as it will not be used on portions with collision points,
- among all the tools available in the specification tree, only those relevant to the Machining Operation are listed.
- The Split on Collision Points command tries to keep the initial structure of the Machining Operation:
- If the Machining Operation contains a tool with no tool-holder, Split on Collision Points proposes only tools with no tool-holder. As the collision occurs with the non-cutting part of the tool, you need a tool with no holder, with the same cutting end but a larger cutting length.
- If the Machining Operation contains a tool and a tool-holder, Split on Collision Points proposes only tools with tool-holders. As the collision occurs either with the non-cutting part of the tool or with the tool-holder, you need a tool with a tool-holder, with the same cutting end, a cutting length larger or equal to the initial one and a larger gage. The command searches such a tool only among tools with tool-holders.
- If the Machining Operation contains a tool with a tool-holder, which you want to replace with a simple tool, you must re-create this simple tool as a tool with a tool-holder and a Gage1 value larger than the initial tool-holder. It will then appear in the list of available tools.
- Extra geometry
- In the sensitive icon, select additional geometry to the part in the Machining Operation where the tool
path was computed.
Additional geometry may be a face or a clamp that you would rather
avoid using in the computation and that is not defined in the
Machining Operation.
- Split inside machining pass
- Allows the Split on Collision Points command to split
a tool path between an approach and a retract motion (i.e. inside a
machining pass).
- Use part
- Uses the part you defined in the Machining Operation
to compute the collision points.
- Collision tolerance
- Discretization distance to check for collision between the tool
and the part.
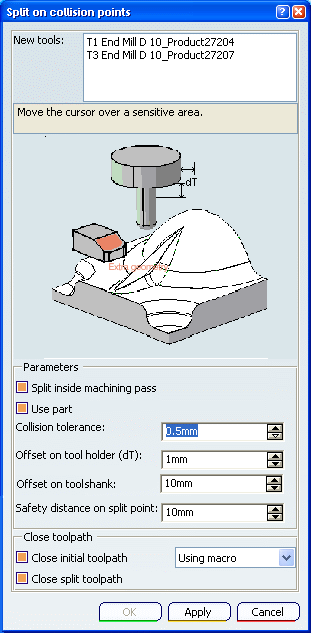
- Offset on tool holder radius (dR)
- Safety distance for the tool holder radius to avoid collision
between the holder and the part.
- Offset on tool length (dL)
- Safety distance for the tool holder length to avoid collision
between the holder and the part
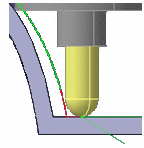
- Safety distance on split point
- Safety distance required on the first or last
collision point to insert a collision free macro. Example:
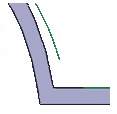
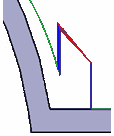
- The collision area is in red.
- After the split, the red area will disappear. But if you add a
circular macro for retract, the retract movement is in
collision.
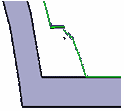
The Safety distance on split point will cut the tool
path before the last or the first collision free point to ensure
that the retract or approach macro will be collision free.
- Close initial tool path, Close
split tool path
- Let you close automatically the tool paths resulting from the
Split on Collision Points command.
If those check boxes are not selected, you will have to close them
manually.
The split tool path is closed by adding retract and approach macros
while there are two methods to close the initial tool path
automatically:
- using a macro: collision free approach macro and optimized
retract macros are added.
They are read from the initial Machining Operation.
If this is not possible (due to collisions), a Back
macro will be added for the approach, and a Along tool
axis macro will be added for the retract.
- following the part: no retract nor approach macro is added and
the tool path that is computed follows the part.
- Example:
- The collision area is in red:
- The tool path has been split:
- It is closed using macros:
or following the part:
|