Creating an Area Fill | |||||
|
| ||||
Click Area Fill Creation
 in the Dress-Up toolbar.
The Tools Palette toolbar appears.

Click Automatic Detection
 and then click inside the area for which you just defined
the profile, under the line which represents the fillet edge.
and then click inside the area for which you just defined
the profile, under the line which represents the fillet edge.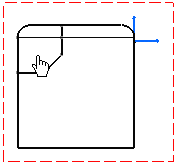
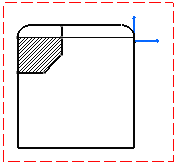
The area to fill is detected, based on where you clicked and the area is filled with the selected pattern. The Tools Palette toolbar disappears.
Optionally, you can select another pattern for your area fill. To do so:
- Make sure the area fill is selected and click the down arrow besides Pattern
 in the Graphic Properties toolbar.
- In the Pattern dialog box, select a pattern for your area fill and click OK.
- Make sure the area fill is selected and click the down arrow besides Pattern
Click Area Fill Creation
in the Dress-Up toolbar.The Tools Palette toolbar appears.
Click Automatic Detection
and then click inside the area for which you just defined
the profile, under the line which represents the fillet edge.The area to fill is detected, based on where you clicked and the area is filled with the selected pattern. The Tools Palette toolbar disappears.
Optionally, you can select another pattern for your area fill. To do so:
- Make sure the area fill is selected and click the
down arrow besides Pattern in the Graphic Properties toolbar.
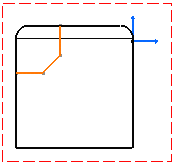
- In the Pattern dialog box, select a pattern for your area fill and click OK. Define your area fill profile by creating lines. In this example, sketched elements (the ones you create) are selected (they are shown in red), and generative elements are shown in black.
The area fill profile will therefore consist of both sketched and generative elements.
Tip: You do not need to activate the view in which you are going to create an area fill. - Make sure the area fill is selected and click the
down arrow besides Pattern