Adding Attribute Links to Text

You can add one or more links to text. Text attribute links let you annotate drawing representations with texts that reflect important information extracted from the 3D shape or product (such as a part number, the owner of a representation, etc.).

Important: In the current version, text attribute links are not associative to PLM entities. This means that you cannot reference the attributes of 3D shapes or representations with associativity, but you can display attribute values in a text rapidly. This lets you fill a title block in a drawing, for example.

This task shows you how to:


Before you begin: Open a 3D part containing a hole and, in a drawing representation, generate a view of this 3D part.
Related Topics
More About Adding Attribute Links to Text

Creating an attribute link between an element on the 3D shape and the corresponding text in a drawing view

You can create an attribute link between an element on the 3D shape and the corresponding text in a drawing view.

  1. In the Annotations toolbar, click Text or Text With Leader and click in the active view, where you want to create the annotation. An empty text is created in the drawing. Also, the Text Editor dialog box is displayed.

  2. Optionally, if you want to add text before the attribute link, enter it now in the text editor dialog box. The text in the drawing is updated as you type.

  3. Right-click anywhere in the drawing (whether or not the text is empty), and select Attribute Link from the contextual menu. The Insert Text Attribute dialog box is displayed. It is empty for the moment.

  4. Select the object to which you want the text to be linked (from the specification tree, from the 3D space or from the drawing representation).

    For the purpose of this scenario, click the hole in the 3D space. The dialog box is updated with the list of attributes related to the selected element.
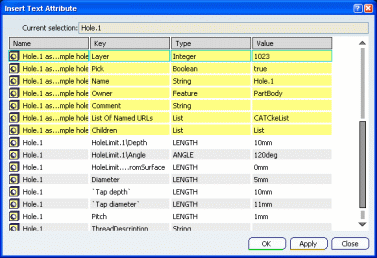


    In the Insert Text Attribute dialog box, each line represents an attribute of the selected object or of an associated object. Lines can either have a yellow or a grey background:


    • A yellow background indicates that the attribute will be inserted without an associative link.

    • A white or a grey background indicates that the attribute will be inserted with an associative link.

  5. In the list, once you have chosen the attribute(s) you want to insert, you have several options.


    • To insert a single attribute and close the dialog box, you can either:


      • double-click the related line.

      • click the related line and then OK.

    • To insert several attributes: click the related line and then click Apply for each attribute you want to insert. When you are done, click OK to close the dialog box.

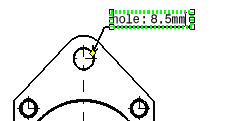
    The attributes are inserted both in the Text Editor dialog box and on the drawing.

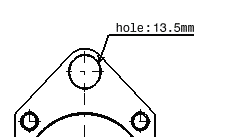
    The example below shows the diameter value of the hole; this attribute contains an associative link.


  6. Optionally repeat steps 3 to 5 to insert attributes for additional objects.

  7. Click OK to validate and exit the Text Editor dialog box.

  8. If you now modify the diameter value of the hole on the 3D part, the drawing view is shown as being not up-to-date. If you update it, the text attribute value is updated to reflect this modification.


    Important:
    • At this step, you can perform a query on the link(s) you just created. To do so, right-click the view and select Query Objects Links. The Query Link dialog box appears, displaying a list of the existing links.
    • You can only modify the part of the text that is not of the text attribute type. Modifying the text attribute requires isolating it first. To do so, right-click the text attribute and select Isolate Text.
    • You cannot replace text in attribute links (even though attribute links are displayed and the Replace button is available in the Links dialog box, which is available through Edit > Links).
    • To define the display of the attribute link to text, select Tools > Options > General > Parameters and Measure > Units tab.

Assigning an attribute link to a view

You can assign an attribute link to a view.

The document is still open from the previous task.

Creating a parameter

You can create a parameter.

  1. Click the Formula icon from the Standard toolbar.

    The Formulas: Drawing dialog box is displayed.

  2. In the drop-down lists next to the New Parameter of type button, choose the String with Single Value type.

  3. Click the New Parameter of type button.

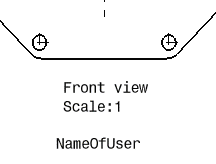
  4. In the Edit name or value of the current parameter fields, replace String.1 by UserName in the first field, and enter the value, i.e. NameOfUser in the second field.

  5. Click Apply and then click OK. The parameter is created, and it is displayed in the Drafting specification tree, under the Parameters node.

    Important: If the Parameters node is not displayed in the Drafting specification tree, go to Tools > Options > General > Parameters and Measure, Knowledge tab, and check the With value and With formula options.

Defining the Text Attribute

You can define the text attribute.

  1. Click the Text icon from the Annotations toolbar and click in the free space.

    An empty text is created in the drawing (in the active view). Also, the Text Editor dialog box is displayed. Do not pay attention to this dialog box yet.

  2. Right-click anywhere in the drawing (whether or not the text is empty), and select Attribute Link from the contextual menu. The Insert Text Attribute dialog box is displayed. It is empty for the moment.

  3. Select the object to which you want the text to be linked. For the purpose of this scenario, select the drawing representation from the specification tree.

    The dialog box is updated with the list of attributes related to the selected element.

  4. Scroll down the list and select UserName in the Attribute List.

  5. Click OK. The value assigned to UserName, i.e. NameOfUser, is displayed in the Text Editor dialog box as well as on the drawing view.

  6. Click OK to close the Text Editor dialog box.


Modifying the Text Attribute

You can modify the text attribute.

  1. Double-click the UserName parameter in the specification tree.

    The Edit Parameter dialog box is displayed.

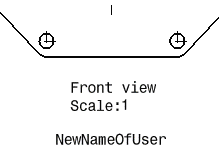
  2. Change the parameter name (NameOfUser) to NewNameOfUser.

  3. Click OK. The parameter name is automatically updated on the view.