Reorder Components in a Bill of Material
You can change the sequence of the components displayed in a bill of material.
Right-click the bill of material and select Table.x object > Edit Bill Of Material.
Note:
You can also edit the bill of material using one of the following ways:
- Double-click the BOM.x object available in the specification tree.
- Right-click the BOM.x object in the specification tree and select BOM.x objet > Definition....
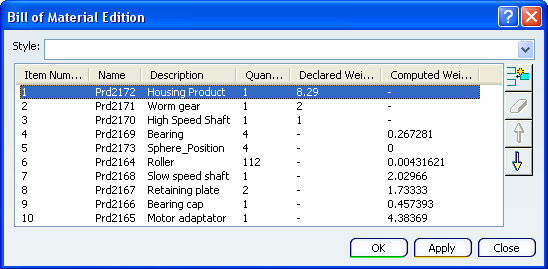
The Bill of Material Edition dialog box appears.

Note:
For the purpose of our scenario, use this example and reorder item no. 3.
Select the item no. 3, High Speed Shaft and click Move up  . .
The selected item moves up one level. Repeat this step till it reaches the required position.
Click OK.
The selected item is reordered to position 1.

Notes:
- The text properties of the selected item remain the same as they were, even after changing the sequence or reordering components.
- After reordering a component, all the item numbers are automatically updated.

Add a Row in a Bill of Material
You can add a blank line/row to reserve a number in a bill of material. This allows you to add information which will be stored in the bill of material.
Right-click the bill of material and select
Table.x object > Edit Bill Of Material.
The Bill of Material Edition dialog box appears.
Note:
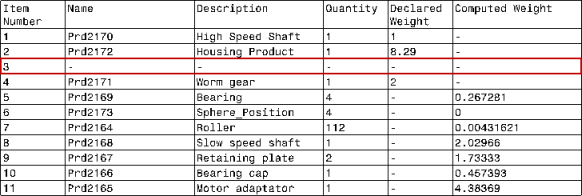
For the purpose of our scenario, use the above example and add a line above item no. 3.
Select item no. 3, Worm gear and click New  . .
A blank row is added above the selected item. All the item numbers are automatically rearranged.

Note:
The newly added row is not associated to a product and can be deleted by clicking Delete  . .

Delete a Row in the Bill of Material
You can delete a reserved line which is not associated with the product.
Right-click the bill of material and select
Table.x object > Edit Bill Of Material. The Bill of Material Edition dialog box appears.
Note:
For the purpose of our scenario, use the above example and delete the previously added line.
Select the newly added line and click Delete  . . The selected line is deleted.


Update a Bill of Material After Part Modification
You can update the bill of material at any time, but it is not integrated in the drawing update and update status. You can update it by using an explicit Update Bill Of Material contextual command. This command updates the bill of material based on the product information.
If you perform any modification in the product structure on which the bill of material is computed by means of replacing a part, deleting a part or adding a new part, you need to update the bill of material. Also, if you modify properties of a product which is represented in a bill of material, then you need to update the bill of material. For the purpose of this scenario, use above example, perform part modification and update the bill of material.
Replace the part named Worm gear with High Speed Shaft . Refer to Assembly Design User's Guide: Assembly Components: Replacing Components for more information.
You can replace a component (partial - not on all instances) in the bill of material in either of two ways:
Right-click the bill of material and select Table.X object > Update Bill Of Material. Note:
You can also use the contextual menu on the displayed bill of material object in the specification tree and select BOM.x objet > Update Bill Of Material .
The bill of material is updated.

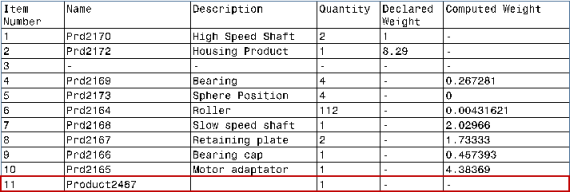
- Note that the part High Speed Shaft already exists, so its quantity attribute has been increased (to 2).
- Replaced part Worm gear has been removed. Its item number has not been reassigned. However, if a new part is added in the bill of material, and if the empty line is manually deleted, then, the item number will be reassigned. Otherwise the item number will be kept on the blank line replacing the line where the deleted product used to be.
Add a new part under this product. Refer to Assembly Design User's Guide for more information. A new part is added in the product structure. Right-click the bill of material and select Table.X object > Update Bill Of Material.

The new part is added at the end of the bill of material if the last line is not a blank line. However, if you add a blank line at the end of the table, additional parts will be inserted above this blank line. Remove a component from the product. Refer to Assembly Design User's Guide for more information. Note:
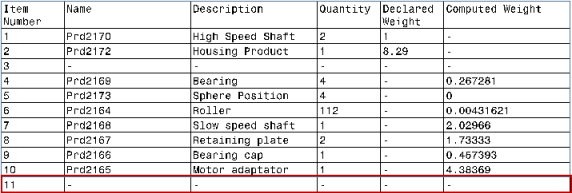
For the purpose of our scenario, delete the newly added Product2487.
The selected part is deleted from the product structure. Right-click the bill of material and select Table.X object > Update Bill Of Material. The bill of material is updated and the component is removed from the bill of material.


Modify the Structure of a Bill of Material
You can change the content and structure of a bill of material to modify it. You can modify the cells value by editing the cells (generic table edition), adding text to the cell, or removing the attribute link to overload the value; useful to overload quantities, for example.
Perform either of the following operations:
- Select a column from the bill of material and change its column width using the contextual menu.
- Select a column from the bill of material and insert a new column using the contextual menu. The newly inserted column allows you to manage other properties.
- Modify the cells which do not display properties values.
Right-click the bill of material and select Table.X object > Update Bill Of Material All the modifications done in the structure of the bill of material such as column width modifications, manual addition of columns and manual modifications of cells are kept after update. These modifications are persistent while updating the bill of material. Notes:
- Through customization of structure of the bill of material, you can overload the quantity, modify the computed weight, add specific comments and so on.
- However, you cannot merge the cells that display item properties. Merge functionality is available only for manually added columns or rows cells.
|
![]()
![]()
![]()
![]()


