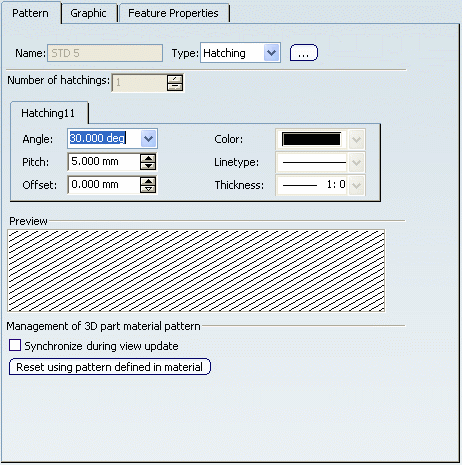
Pattern Tab | ||
| ||
Important:
|
General
- Name
- Specifies the name of the pattern.
- Type
-
Select a pattern type in the drop-down list.
- Hatching
- Patterns are displayed as hatches.
- Dotting
- Patterns are displayed as dots.
- Coloring
- Patterns are displayed using the selected color.
- Image
- Patterns are displayed using the selected image.
- [...] button
- Click this button to choose from the various patterns available. This will display a dialog box from which you can make your selection.
- Number of hatchings
- Specifies the number of different hatchings defined in the current pattern. A tab is available for each hatching.
![]()
HatchingXX
- Angle
- Set the angle value in degrees for this hatching.
- Color
- Set the color used for this hatching.
- Pitch
- Set the pitch in millimeters for this hatching.
- Linetype
- Set the linetype used for this hatching.
- Offset
- Set the offset in millimeters for this hatching.
- Thickness
- Set the line thickness used for this hatching.
![]()
Management of 3D part material pattern
- Synchronize during view update
- Select this check-box if you want the properties of the pattern to be automatically synchronized with those associated with the 3D part material, during each view update.
In this case, you should not modify other properties in this dialog box.
Note: In a Generative Drafting context, this option is available for generated patterns, when a material is associated to the 3D part. Otherwise, the following message is displayed instead: No Material On Part. In the case of patterns representing area fills, this option is not available.
 By default,
this option is not selected.
By default,
this option is not selected.
- Reset using pattern defined in material
-
Click this button to synchronize the pattern in accordance with the pattern associated with the 3D part material .
Important: This button will be disabled when Synchronize during view update is selected. In this case, you can update the drawing or the view containing the selected pattern. The button will then be available.