Generating a Check Report | ||||||
|
| |||||
Expand the specification tree, right-click the rule base object under Relations, and select Rulebase Object > Settings.
The RuleBase Settings dialog box opens.
Refer to what follows to fill in the areas:
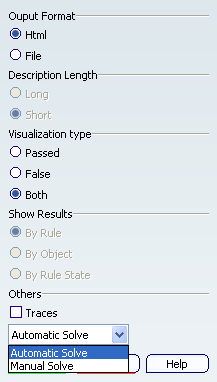
In the Output Format area of the window, check:
- Html to generate the report in html format.
- File to generate the report in text format. In this mode, the Description Length and the Show results options are activated by default.
In the Description Length area of the window, check:
- Long to insert the Help message specified at the check creation.
- Short if you do not need the Help message.
In the Visualization area of the window, check:
-
Passed: to include in the report only information about the features for which the checks are valid
-
False: to include in the report only information about the features for which the checks are invalid
-
Both: to include in the report information about all the features on which a check has been applied.
In the Show Results area of the window, check:
-
By Rule to organize your report data by rule in the file.
-
By Object to organize your report data by object.
-
By Rule State to organize your report data by rule state.
In the Others area of the window, check and/or select:
- Traces to display the steps of the solve process.
- Automatic Solve to perform an initialization and a solve operation on the objects within the 3DShape context whenever the 3DShape is updated. The RuleBase is not automatically solved in a non 3DShape Context.
- Manual Solve
to avoid an automatic initialization and a solve
operation on the objects within the 3DShape context.
If you select this option you should click
Solve
 .
The Manual Solve command can also be
accessed by right-clicking the Rule Base.
.
The Manual Solve command can also be
accessed by right-clicking the Rule Base.
Click Report
 to find out what holes are not activated. The html page displayed
provides you with the ratio of the holes that fulfill the check.
75% of the holes are activated - Click the check name hyperlink
to obtain details on the features satisfying or not satisfying the
check.
to find out what holes are not activated. The html page displayed
provides you with the ratio of the holes that fulfill the check.
75% of the holes are activated - Click the check name hyperlink
to obtain details on the features satisfying or not satisfying the
check.Note: The Help message which is displayed in column 5 of the check report.