Define Attributes
You are going to define the attributes of your report template.
Click  and select Knowledgeware > Rules > Knowledge Expert. and select Knowledgeware > Rules > Knowledge Expert.
The Start-Step1-Product dialog box is displayed.
Select Product and click Next and Finish.
Open the Product containing Pads with Holes.
Click Create Report Template  . .
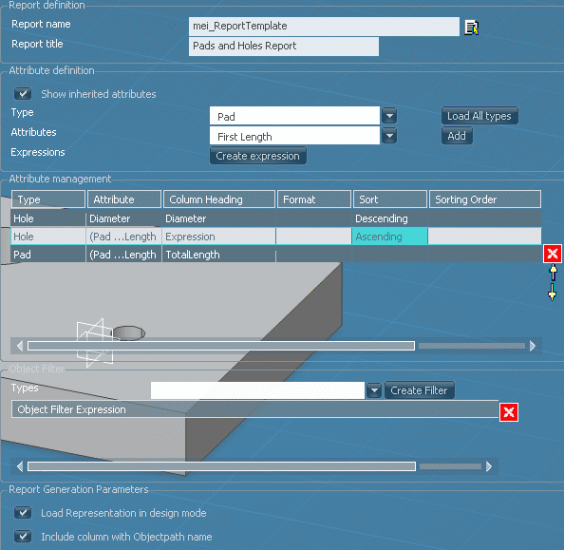
A Report Template Definition dialog box is displayed.
Enter the report name in the Report Name field, ReportTemplate.xml in our example.
Enter the Report title, Pads and Holes Report in our example.
Note:
- The Report Name is the name under which you save the report in the database.
- The Report Title is the title of your report.
Click Load All types to load all NLS supported types. Select the type to which the report will apply from the Type drop-down list, Hole in our example. Select an attribute from the Attributes drop-down list, Diameter in our example, and click Add. The attribute is displayed in the Attribute Management frame.
Repeat the last two steps and select Hole as the type to be used, and Depth as attribute. Click Add. Select Pad from the drop-down list and First Length as attribute and click Create Expression. The Expressions dialog box is displayed. Select an output attribute type from the drop-down list in the Literal field, Length in our example. Then, click Create/Edit expression. The Expression Editor dialog box is displayed. Enter an expression, Attribute = ThisObject .FirstLength + ThisObject .SecondLength for example in the Signature of the edited expression frame. Click OK when done and Close.

Manage the Attributes
You can sort the attributes, define the sorting order, and rename them.
Double-click the Column Heading for the Pad and rename it into TotalLength.
In the Attribute management frame, double-click the Sort column to assign a sort order to both Hole types. Ascending for the first one and Descending for the second one.

Notes:
- Type: It is the type of the object you selected when adding the attribute. You cannot edit this value.
- Attribute: It is name of the attribute. You cannot edit this value.
- Column Heading: Defines the heading of the column for the attribute. The default value is name of the attribute. You can choose to enter the column heading which will be used as heading in the generated report.
- Sort: Is provided in ascending or descending order. To specify the ascending or descending order, double-click the column cell and choose the appropriate option (Sorting is provided for up to 3 columns.)
- Sorting order: Specifies the order for sorting the multiple columns. Priority is defined by the keywords First, Second, and Third. These keywords determine the priority in which the columns are sorted.
- GroupBy: It groups the selected attributes. GroupBy is provided only for single columns.
- Operations: It performs mathematical operations like sum, average, maximum, minimum, and counts for the attribute.
In the Attribute management frame, apply a sorting order to both Hole types. First for the first one and Second for the second one. Note:
- When sorting, if the type of Sort is defined and the Sorting Order is not defined for a particular attribute, then the first sort is taken into account.
- If one of the sort orders is missing, the sort orders that are of lower order are given higher priority (e.g. if only the First and the Third orders are defined and not the Second one, then the Third one is considered as the Second order. )

Select the Parameters
You can also define the parameters of the report.
Leave the Report Generation Parameters as they are. Note:
Load Representation in design mode: This option enables you to load all the representations in Design mode thereby selecting all features aggregated under representations. For example, if you want to generate a report on pad objects, the session you work in is in Visualization mode and this option is checked, the Report generation command loads the Representation in Design mode there by selecting all pads located below the representation. If you want to generate the report on product occurrences, uncheck this option. Include column with Objectpath name: Check this option if you want to include the object path column into the generated report.
Click the Save button. A Document dialog box is displayed. Note:
You can choose to preview the report before saving it. To do so, click Report Preview. Doing so selects all objects in session which match the type defined in the report template window. You cannot save this report preview.
Click the Finish button. Click the Close button to close the Report Template Definition dialog box.
|