Creating a Component Family

This task shows you how to create a Component Family. A family is mainly defined by a generic model and a table of parametric modifications applied to the model. When creating a family, you are requested to provide the model. A preliminary search of tables is performed. If several tables exist in the model, you must choose the one that defines the family. The model can be a Part (defined by a Product PLM Reference aggregating one or several Representation instances), or an assembly. The generic model must contain all objects/relations needed to update it after applying parametric modifications for a given row in the table. After selecting the model and the table, all family items are generated (each row of the table defines a family item). Those items are initially not resolved models. Bear in mind that family items are not parts or assemblies but just objects that represent final (resolved) models.


Before you begin: You must have saved a Product containing a table in the database.
Related Topics
Creating a Table
  1. From the PLM Access menu, select New.

  2. In the New PLM Type window, expand the All Types node and select Component Family. Click Next. The Component Family window opens.

  3. Enter the name of the family in the Name field.

  4. Click the Component Family Model tab.

  5. Click the File icon in the Generic Model field to select the model you want to use. The Select a Generic Model window opens.

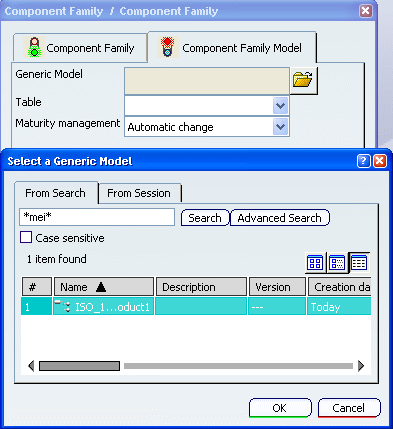
  6. Click Search and select the model in the list. Click OK.


  7. Select the table in the Table scrolling list.


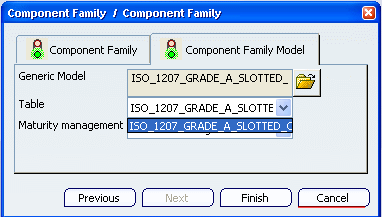
  8. Select the maturity in the Maturity management scrolling list.

    The Maturity management field allows you to specify the behavior of the resolution mechanism for the family item regarding maturity changes:

    • If set to Automatic Change, the maturity of the resolved items is modified during resolution.
    • If set to Manual Change, the maturity of the resolved items is the default one, but it can be modified either using VPM Navigator command, or using the Change maturity of resolved models command . To find out more about maturity, see Changing the Maturity of the Generic Model and Changing the Maturity of Resolved Models.

    Note that the resolution is the generation of PLM Components corresponding to the family item.

  9. Click Finish when done. The Component Family editor opens.

  10. Once in the Component Family editor, the Maturity Change mode offers the possibility to switch between either an Automatic or a Manual mode at any time and not only when creating a Component Family. To find out more about this method, see Using the Maturity Change Mode.