Positioning a Foreshortened Extremity Manually

You can create a foreshortened radius dimension and then position its extremity manually.


Before you begin:
  • By default, the Radius Dimensions command is unavailable in the Annotations toolbar. To make it available, you need to customize the toolbar. For more information, refer to Customizing a Toolbar by Adding Commands.
  • In a drawing representation, create geometry, for example a rectangle containing circles.
Related Topics
More About Positioning a Foreshortened Extremity Manually
  1. Click Radius Dimensions in the Annotations toolbar.

  2. Select a circle in the view.

    The radius dimension is displayed.

  3. Click at required location to position the dimension.

    The radius dimension is created in the view.

  4. Right-click the dimension and select Properties > Dimension Line tab and select the Foreshortened check box.

  5. Specify the parameters as described in More About Positioning a Foreshortened Extremity Manually to create a foreshortened radius dimension.

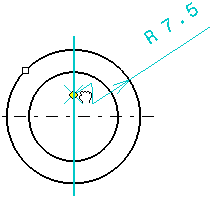
  6. Select the Position extremity point manually check box to position the extremity manually.

    1. Select the dimension to display its extremity manipulator.
    2. Drag the extremity manipulator and drop it over a valid element.

      While dragging the manipulator, the element is highlighted. You can now drop the extremity anywhere on this element. The extremity is associative as long as it is dropped directly on the linear element.


      Note: If you drag the extremity manipulator over an invalid linear element, the element is not highlighted. In this case, dropping the extremity results in positioning it without any associativity.

  7. Optional: You can isolate the foreshortened extremity from its reference. To do this, right-click the extremity manipulator and select Isolate.