More About Working with Datum Targets | ||||
|
| |||
Datum Target Creation Dialog Box
This sub-topic provides more information about datum target creation dialog box, which appears while creating a datum.

During datum target creation, if the Use style values to create new objects check box is selected in Tools > Options > Mechanical > Drafting > Administration tab, Style area, then boxes in this dialog box are initialized as follows:
- Area Size: Initially this box is empty.
- Area Shape icon box: It initializes depending upon the values specified in the Tools > Standards > Drafting > [StandardName] > Styles > Datum Target > Size Specifier parameter.
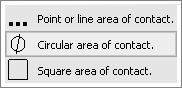
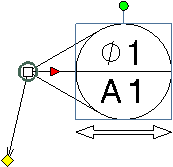
Note that, if the Use style values to create new objects check box is not selected, then the Area Shape icon box and the Area Size Editor box are initialized to the values of the last datum target created. - Associated Datum: It initializes to A1.
All the existing datum features of a drawing or a layout are parsed to retrieve the highest letter of all the letters used. For example, if a drawing contains datum features such as, A, B, D, then the letter D is selected.
Then all the datum targets are parsed to check if there are datum features which already use this letter. If it is not the case, then the Associated Datum is initialized with the selected letter and the number 1. Otherwise, it is initialized with the selected letter and the maximum number is incremented by 1.
So in this case, if the drawing contains datum features with associated datum text A1 and B1, the associated datum is initialized to D1.
If it contains A1, B1, D1 and D3, the associated datum is initialized to D4.
Tip:
You can click Reset  to reset the Area Size box to an empty string, the Associated Datum box to A1 and the Area Size diameter symbol to the datum target style value. to reset the Area Size box to an empty string, the Associated Datum box to A1 and the Area Size diameter symbol to the datum target style value. |
![]()
Positioning a Datum Target
This sub-topic provides information about positioning a datum target.
The anchor point of the leader is either in a fix or in an automatic mode.
For a movable datum target, two anchor points are available. Therefore, in Automatic Positioning mode, depending on which side (left or right) of the datum target the first leader point is, the anchor point nearest to that side is selected.
For a non-movable datum target, only one anchor point is available, that is, the center of the circle. Therefore, it is not possible to switch between the fix and the automatic mode of the leader.
Note: You can switch between the fix and the automatic mode of the leader using the contextual menu on the anchor point manipulator. However, for movable datum target, the Allow only standard positions command is not available, since there are always two possible positions for the anchor point of the leader.
![]()
Manipulators on a Movable Datum Target
The movable datum target manipulator is added on the side where the first leader is. The manipulator is oriented to the inside of the datum. Therefore, when you click the red manipulator, it changes the datum to not movable.
The following manipulators are available on a movable datum target to manage the leader:
| Manipulator | Allows to |
|---|---|
 |
Change the anchor point of the leader. |
 |
Resize the leader attachment (offset between the anchor point and the first point of the leader). |
| Slide the annotation text along the leader attachment direction. |