Creating Variable Offset Surfaces | |||||
|
| ||||
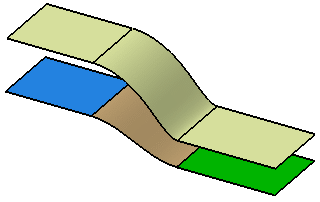
Create a Variable Offset Surface
You can create a variable offset surface by offsetting an existing surface.
The Variable Offset Definition dialog box appears.
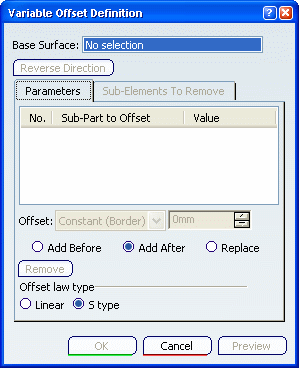
Select each sub-part to be offset (whether wires or surfaces) and define its offset type from the Offset drop-down list:
- Variable: applies a variable offset to the sub-part. The offset value field is unavailable.
- Constant: applies a constant offset to the sub-part. Specify the offset value.
Important: If the sub-part to offset is an element such as a line, curve, or edge, you can select the offset to be: - Constant (Border): The element is considered as a border element. Hence, it must lie on a boundary.
- Constant (Inner): The element is considered as a constant constraint within a variable area. Hence, it must lie in a variable area and not on a boundary.
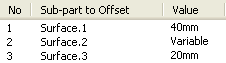
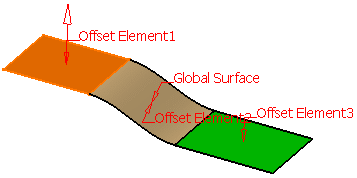
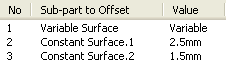
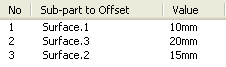
In our example, we defined a constant offset value of 40mm for Surface.1, a variable offset value for Surface.2 and a constant offset value of 20mm for Surface.3.
You can use the following options:
- Replace: to replace the selected surface by another surface,
- Add Before : to add a surface before the selected surface,
- Add After : to add a surface after the selected surface,
- Remove : to remove the selected surface.
Click OK.
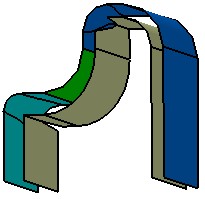
One single feature is created: an automatic join of the resulting areas is performed if the result quality allows it (G1 connections). The surface (identified as Variable Offset.xxx) is added to the specification tree.
Warning: - All adjacent surfaces that are tangent continuous must have the same offset value. Otherwise an error message is issued.
- There should not be any fading edges between two surfaces that have different offset values.
![]()
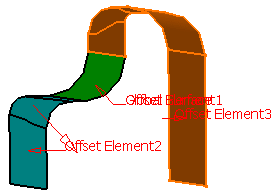
Remove Sub-Elements
The Sub-Elements to remove tab helps you for the analysis in case the offset encounters a problem.
Click Variable Offset
 .
.The Variable Offset Definition dialog box appears.
Select each sub-element to be offset (whether wires or surfaces) and define its offset type:
Click Preview.
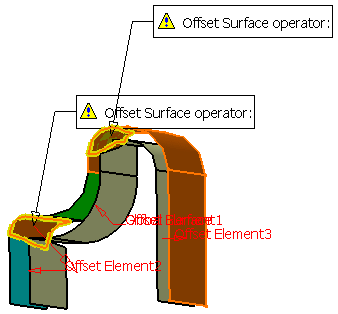
A Warning message appears and informs you that some sub-elements are erroneous. The geometry shows these sub-elements and flag notes display the sub-elements to remove.
Click Yes to accept the offset.
In the Variable Offset Surface Definition dialog box, the Sub-Elements to remove tab lists the erroneous sub-elements and a preview of the offset is displayed.
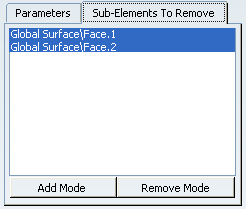
Tip: Both offset types apply to wires and surfaces. The following modes are optional, you may use them if you need to add or remove a sub-element to create the variable offset.
- Add Mode:
- when you click an unlisted element in the geometry, it is added to the list
- when you click a listed element, it remains in the list
- Remove Mode:
- when you click an unlisted element in the geometry, the list is unchanged
- when you click a listed element, it is removed from the list
Warning: The list of sub-elements to remove is updated each time an element is added. Note that if you modify an input in the Offset dialog box, the list is re-initialized. Important: If you double-click the Add Mode or Remove Mode button, the chosen mode is permanent, i.e. successively selecting elements will add/remove them. However, if you click only once, only the next selected element is added or removed. You only have to click the button again, or click another one, to deactivate the mode. - Add Mode:
Click OK to create the surface.
The surface (identified as Variable Offset.xxx) is added to the specification tree.
![]()
Create a Constant Offset Surface
You can create an offset surface whose sub-elements have several constant values. The offset surfaces are automatically extrapolated or split so that they connect together.
Click Variable Offset
.The Variable Offset Definition dialog box appears.
Select each sub-element to be offset and apply a different constant offset value to each of them as shown in the picture below:
Click OK to create the surface.