Creating an Auxiliary View | ||||||
|
| |||||
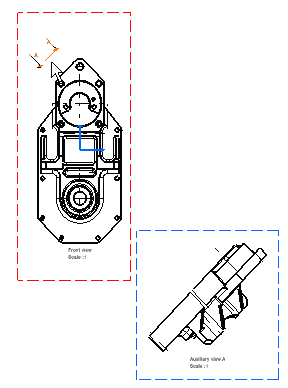
Click Auxiliary View
 in the Views toolbar (Projections sub-toolbar).
Click to position the callout.
The reference plane is automatically positioned according to the selected edge. Positioning the auxiliary view callout amounts to defining the auxiliary view direction.
Click to position the auxiliary view.
Before clicking, as you move the cursor within a zone perpendicular to the plane, a preview of the auxiliary view to be created appears. This view will be automatically positioned accordingly. This is also true when creating a section view or a section cut.
You can also move the cursor outside the zone perpendicular to the plane and position the view where you want.
Important: - You can choose the auxiliary view axis orientation. To do this, go to Tools > Options > Mechanical > Drafting > Layout and select the Auxiliary and/or section views orientation according to profile check box.
- You can move the view freely after it has been created, providing you position it independently of its reference view. Refer to Positioning a View Independently of its Reference View for more information.