Creating an Offset

You can create a feature to expand or to contract the selected features by a specified distance using the Offset command. A positive offset expands the volume while a negative value contracts the volume.

The same offset is applied to the volumes of each selected feature. If a positive offset is specified, each of these features expands by the offset maintaining the wall thickness.

Related Topics
Using the Display Only Parents Option to Retrieve a Creation Context
  1. Click Offset .

    The Offset dialog box appears.


  2. Select the pocket as the feature you want to offset.


  3. Enter 5mm to define the offset distance.

    This defines the distance to move each of the faces of the bodies that are being transformed. The distance of all selected features will be applied to expand the volume, if the distance value is greater than 0.0. Conversely, if the distance value is less than 0.0, it will be contracted.

  4. Click OK.


  5. Double-click the pocket to edit its filleted edges and see the impact on the offset feature.

  6. In the Pocket dialog box that is displayed, select the Fillet tab and clear Lateral radius.

    Constant fillet walls may not be retained when the offset is applied. If the walled feature, in this example the pocket feature, has the Constant wall thickness option selected and the lateral faces are filleted (A), the constant walls will be retained with the offset feature modifier. However, if a walled feature has constant fillet walls and lateral faces are not filleted (B), the constant walls will not be retained at the corner.
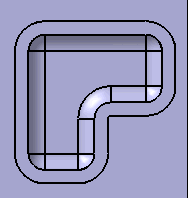


    (A) Pocket with constant walls and lateral filleted faces
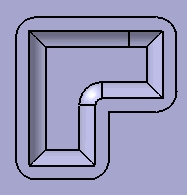


    (B) Pocket with constant walls and no lateral filleted faces