More about Sweeps | ||||
|
| |||
Draft Tab
This section describes the various options available in the Draft tab.
The Draft tab available in various feature dialog boxes provides the following options:
Draft behavior
The Draft behavior box lets you chose how you want to generate drafts:
- None: There is no draft.
- Intrinsic to feature: You can perform a draft operation by defining the following:
- an angle value
- a neutral element
- Profile plane: The default neutral element defines a neutral curve on which the drafted face will lie.
- Plane/Surface: If this is chosen, the Selection box is active. You just need to select the plane or surface of interest. Also, you can select a sketch, and a Generative Shape Design surface of the required extent will be automatically built internally.
- Draft Properties: You can perform a draft operation by defining the followings with the faces to be drafted. Note: You need to define Draft Properties
- a neutral element
- Profile plane: The default neutral element defines a neutral curve on which the drafted face will lie.
- Plane/Surface: If this is chosen, the Selection box is active. You just need to select the plane or surface of interest.
- Use parting element: This option will be available when Draft properties is selected. The Neutral element is equivalent to the selected Draft Properties Parting element.
- Faces to draft: Faces to draft functionality can control which faces are drafted. There are three options:
- All lateral faces
- Selected by pull direction: Automatically selects the faces to draft to be those that are parallel to the pull direction vector.
- Select profile curves: This method allows you to specify what faces to draft by picking curves of the boundary profile. I.e.: the defining profile curve for the face. You need to select Curves. There are two options available:
- First limit
- Second limit
Parting Element
When the Profile Plane or Plane/Surface options are chosen to define the neutral element, Parting=Neutral is active by default. Moreover, when Parting=Neutral is active, Draft both sides becomes active, too. If Draft both sides is on, the draft will be symmetrical on the parting element.
Three options are available:
- Parting=Neutral: If this is chosen, the plane or surface you selected as the neutral element is also used as the parting element.
- Draft both sides: If this is chosen, the draft operation applies to both opposite directions from the parting element.
- Draft fillets: If this is chosen, the fillets are applied before the draft is created. Sometimes small edges that do not lie on the parting surface might be created. With this option, the fillets will become the variable radius fillets instead of the constant fillet and it prevents to generate the extra edges.
Important: This option is also available in the Fillet tab. It operates simultaneously in the both Draft and Fillet tabs.
![]()
Control Tab
This section describes the various options available in the Control tab.
The Control tab is available in various feature dialog boxes.
It provides the following options:
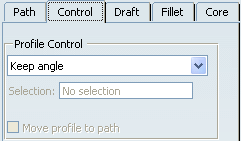
Profile Control
You can control the sweep position by choosing one of the following options:
- Keep angle: keeps the angle value between the sketch
plane used for the profile and the tangent of the center curve.
- Pulling direction: Sweeps the profile with respect to a specified direction. To define this direction, you can select a plane or an edge.
You can also use any of the following creation contextual commands:
- Create Line: For more information, see Generative Shape Design User's Guide: Creating Wireframe Geometry: Creating Lines.
- Create Plane: See Generative Shape Design User's Guide: Creating Wireframe Geometry: Creating Planes.
- Edit Components: Edits the coordinates of the direction's components.
- X Component
- Y Component
- Z Component
- Compass direction
- Reference surface: The angle value between axis h and the reference surface is constant.
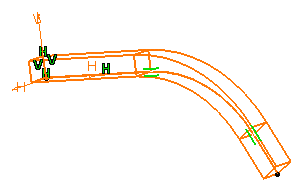
Move Profile to Path
Move profile to path sweeps the sketch such that:
- The anchor point travels along the path
- The anchor direction remains parallel to either the pull direction or the normal to the reference surface
The Move profile to path capability allows you to obtain a simple associative between the profile and the path, and also allows a single sketch to be swept along multiple paths.
To access Move profile to
path capability in
Sweep, you need to follow the steps:
- Set Profile Control to either Pulling direction or Reference surface.
- Select Move profile to path.
- Build the profile with the following understanding:
- The origin of the sketch plane (i.e. 0,0) will be swept along the path.
- The vertical axis of the sketch plane (i.e. 0,1) will be kept parallel to either the pulling direction (if profile control is set to Pull direction) or the normal to the reference surface (if profile control is set to Reference surface).