Routing Conductors Manually | |||||||
|
| ||||||
Route Conductors Manually
You can manually define a route for a conductor by selecting segments one after the other.
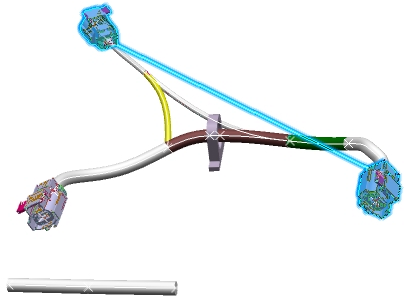
Select a conductor in the specification tree to check if a route has already been defined.
You can select any conductors, even conductors without any ends.
In the image below, note that the ends of the conductor and a virtual line in-between are highlighted; it means that the conductor has not yet been routed.
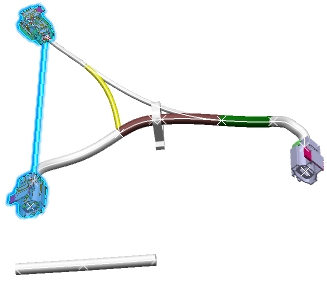
Click Manual Routing
 or select Manual Routing in the Tools menu > Conductor Routing.
Select one or several segments and you obtain this route:
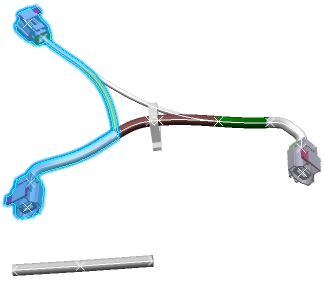
In our example, the route is valid because it is continuous from one end to another, but you could have an invalid route.
If you select a branch in the specification tree, all the branch's segments will be added to the route.
If you have customized the command with the EWRRouting_ValidateSegmentSelectionForConductorRoute business rule, a warning may appear after each segment's selection.
Warning: It is not possible to define a partial route manually and then call the automatic routing to complete it. Both commands cannot be combined and Automatic Routing overwrites manual routes. It is not possible to differentiate manual routing from an automatic one in the 3D space.
The Manual Routing command does not allow to edit the conductor's ends. If you want to modify them, double-click the conductor and the Conductor Creation dialog box opens.
 is displayed as you move the pointer over them.
![]()
Modify an Existing Route Manually
You can modify the existing route of a conductor manually by adding or removing segments.
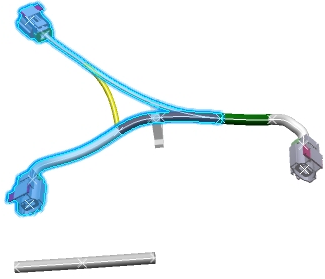
Select a conductor that has been routed.
The route is highlighted in the 3D view:
Warning: If the conductor is sharing the same segments and the same route with other conductors, a dialog box is displayed asking you to apply the route to this conductor only or to all the conductors sharing this route: n conductor(s) share the same route: (name of the conductor(s)). Do you want to modify the route of all the conductors? Yes. No. If you click Yes, you decide to modify the route of only one conductor. Click Manual Routing
or select Manual Routing in the Tools menu > Conductor Routing.
To modify the route, do one or both the following:
- To remove segments from the route, click one or more already selected segments.
- To add segments to the route, select one or more segments.
Even if it is not continuous, this route is possible and still valid.To remove an existing conductor route, click Manual Routing
and all the route segments to deselect them.If you select a branch that was already included in the route, all its segments will be removed from the route.
The next section will explain routing conditions when separation codes have been assigned on conductors and segments.
![]()
Route Conductors Manually when Separation Codes exist
You can create a route or modify the existing route of a conductor manually. The manual routing takes into account separation codes defined on segments and conductors. For more information about separation code, refer to the About the Compatibility Table.
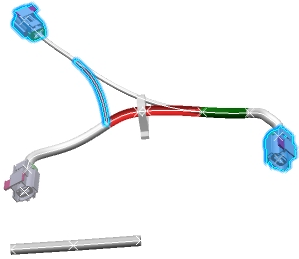
Select a conductor in the Specification Tree.
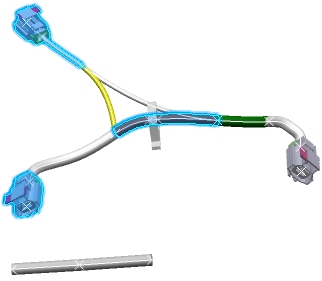
In the image below, note that the ends of the conductor and a virtual line in-between are highlighted; it means that the conductor has no route.
Click Manual Routing
or select Manual Routing in the Tools menu > Conductor Routing.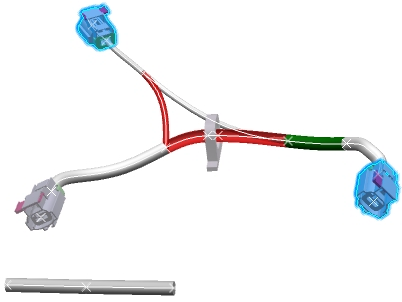
Note that two segments are displayed in transparent red because they are incompatible with the separation code of the selected conductor.
- Click Yes.
The route is applied, even if it is not valid.
It is your responsibility to check the validity of the route or to use the EWRRouting_ValidateConductorRoute business rule.
- Click Yes.