In the Loads toolbar, click Bearing Load
 .
.
The Bearing Load dialog box appears.
Optional: In
the Name box, modify the name of the load.
Select the cylindrical surfaces on which you want to
apply a bearing load.
Multi-selection must be used on different
cylindrical surfaces and not on different elements belonging to
a same cylindrical surface.
Indeed, if you apply a 10N norm force vector on a
multi-selection of three surfaces belonging to the same
geometry, the norm of the global resultant force will be equal
to 30N (and not 10N).
To apply a 10N norm force vector on
three different cylindrical surfaces, the following methods are
equivalent:
- Create three bearing loads (select one cylindrical
surface for each bearing load) with a 10N norm
force vector.
- Create one bearing load (multi-select three cylindrical
surfaces) with a 10N norm force vector.
Optional: By default, the vector components are
defined relative to the fixed global
axis system (fixed global rectangular coordinate system). To choose a different axis system, select User
in the Type list, and select a user axis system in the
specification tree. See Modifying the Axis System.
The name of the user axis system is
displayed automatically in the Current axis box,
and the components of the resultant force are defined
relative to the specified rectangular axis system.Only the
force vector component which is perpendicular to the
revolution axis is taken into account because this component
is a contact component.
Optional: Select the
Display locally check box to display the selected axis
system locally on the geometry.
Enter values for the X, Y and Z components of the
resultant force vector to specify the three components for the direction
of the resultant force.
The norm is computed and displayed automatically. Upon
modification of any of these four values, the resultant
force vector components and magnitude are updated based on
the last data entry. The resultant force vector remains
constant independently of the geometry selection.
You can define the resultant force vector direction
using
the compass. By applying the compass to any part geometry, you can align the
compass directions with the implicit axis directions of that
geometry: drag the compass by handling the red square and drop it
on the appropriate surface. The normal direction to this surface
defines the new direction. Then, click on the Compass Direction
button to take this new direction into account. You can now invert
the direction if desired, editing the values of the three
components.
Symbols
appear on the selected support to reflect the force
orientation.
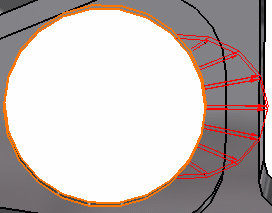
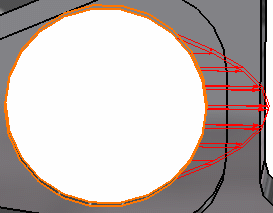
In the Angle box, enter an angle value.
The
angle value corresponds to the angle over which the forces can be
distributed. When you enter an angle value, a highly precise preview
automatically appears on the model.
0
is the default value, <
180 is useful to take into
account some positive clearance,
> 180
is useful to take into account some negative clearance.
Choose the orientation type.
- If you want that all the force vectors at the mesh nodes
are normal to the surface in all points, select Radial.
This is generally used for force contact.
- If you want that all the force vectors at the mesh nodes
are parallel to the resulting force vectors, select
Parallel. This can useful in the case of specific
loads.
In the Profile list, select the profile type
to define how the force intensity varies according to the
angle.
- Sinusoidal
- Parabolic
- Law: or F=f(Θ)
requires that a formal law (Formal parameters) was defined in
Knowledge Advisor (Fog). On the condition you previously
activated the Show relations option in Tools >
Options > Analysis and Simulation (General tab)
command, you can see the Law feature in the specification tree.
No sooner do you select this feature in the specification tree,
that this formal parameter appears in the Law box (Bearing Load
dialog box).
Choose the distribution type
to specify the force distribution.
Click OK.
The bearing load is created.

