Click Spline
 in the Profile toolbar (Spline sub-toolbar).
 Click in the geometry area
to indicate the control points
through which the spline goes or if you know where these points must
be located, use the Sketch tools toolbar which now displays
different value fields for defining the points coordinates.
These value fields are:
-
H: horizontal
-
V: vertical
For the purposes of our scenario, in the Sketch
tools toolbar enter the first control point coordinates:
H=30mm, V=40mm and press Enter.
The first point is created.
Position the cursor in the desired fields to key in
the desired values and press Enter. For example, enter:
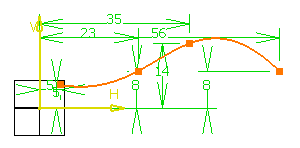
- Control Point (H: 5mm and
V: 5mm)
Repeat the operation to define three additional points:
- Control Point (H: 23mm and
V: 8mm)
- Control Point (H: 35mm and
V: 14mm)
- Control Point (H: 56mm and
V: 8mm)
Double-click the last point you have created to finish
the spline creation.

|