Adding a Printer

You can install new printers in your V6 environment through a dedicated wizard.


Before you begin: You can only print a document if a default printer has been set up through the Printers tab.
  1. Select Tools > Options... > General > Printers.

  2. In the Printer List area, click Add.


  3. In the Add Printer Wizard dialog box, select the printer to be added by clicking the appropriate option:


    • Windows Printer: lets you add Windows printers. When clicking OK, the Connect to Printer dialog box opens to let you select the printer to be added.
    • 3D PLM Printer: this option lets you add printers provided by Dassault Systemes. When clicking OK, the Printer Properties dialog box opens to let you define the parameters for the new printer.

  4. Click OK.


    The capture above takes a 3D PLM Printer as an example. If you add a Windows printer, the properties dialog box will display standard setup parameters corresponding to the selected printer type. See your Windows documentation for detailed information on this dialog box.

  5. In the Printer Properties dialog box, click the black arrow and choose the appropriate driver for the printer.

    Ask your system administrator which printers require which drivers. The available drivers are:

    • PS (Generic PostScript)
    • HPGL/2 RTL
    • HPGL
    • HP DesignJet 1000 Series
    • HP DesignJet 4000 Series
    • CGM Software
    • CGM (Computer Graphics Metafile)
    • OCE
    • Raster
    • V5 Print Plugin Driver
    • EMF (Windows Enhanced Metafile format)
    • PDF
    • SVG.

    This list varies with your operating system.

    Important:
    • SVG (Scalable Vector Graphics) is a language used for describing two-dimensional graphics in XML (EXtensible Markup Language) format. Three types of graphic objects can be read in this format: vector shapes, images and text. For detailed information, browse the following Internet site: http://www/w3c.org.
    • CGM Software is intended for viewing applications but bear in mind that some restrictions apply such as: pixel images are not supported, the image size is fixed, polylines are converted into polybeziers (provided that their curves can be modified).

  6. In the Paper Format box, set the desired paper format options: default and maximum paper size, margins and orientation (portrait or landscape).

    Note that:

    • V5/V6 A0 roll format is 1189 mm large.
    • V5/V6 A1 roll format is 841 mm large.

  7. In the Submission Scripts box, set the desired options activated when the print job is submitted.

    This box lets you specify:

    • The default output file name: each time you print a document, an output file is created at the location you specify in the text box .
    • The default queue name: this box lets you choose which print queue to send the print job to.

  8. Optional: Use the Custom options to specify the location of your own submission scripts.

    Selecting these options activates the Edit Script... buttons which let you modify the script in the Runtime Script window:

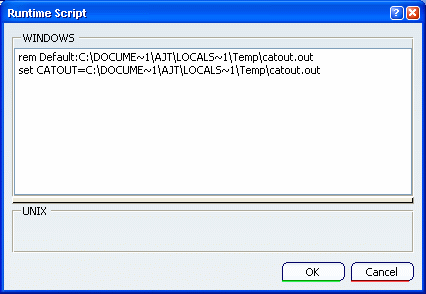
    You can create your own script using the following two environment variables contained in the default script:


    • %CATPRT_DOC_SHEET_COUNT% indicates the number of sheets to be printed. This variable is automatically updated by the application

    • CATOUT=C:\DOCUME~1\ajt\LOCALS~1\Temp\catout_%CATPRT_DOC_SHEET_NUM%.out indicates the location, name and number of the sheet where:
      • "C:\DOCUME~1\ajt\LOCALS~1\Temp\" is the location of the sheet to be printed
      • "catout_%CATPRT_DOC_SHEET_NUM%.out" indicates the name (stored in "catout.out") and number (stored in "%CATPRT_DOC_SHEET_NUM%.out") of the sheet. When printing multiple sheets, the sheet number is incremented automatically. For instance, when using a PostScript printer, you can use this variable the following way set CATOUT=e:\Temp\test_%CATPRT_DOC_SHEET_NUM%.ps to specify that the name of the sheet to be printed is "test.ps" and is located in "e:\temp".

    For an exhaustive list of all the environment variables you can use, see Environment Variables.

  9. Click Advanced Configuration... to define advanced configuration settings for the driver.

    Note that when a printer has been added to the list of printers, you can access advanced configuration settings by right-clicking the printer in the list then selecting Configure.

  10. Click OK to return to the Printer Setup dialog box.

A printer configuration file named PLOT0000.xml containing all the settings you set in the Printer Properties dialog box is created in $HOME/CATSettings/Printers/ which is the default location.

When printing to 3D PLM printers, you can modify the default location of the configuration file through the Printers tab. The numbers of additional printers created are incremented by one, as follows: PLOT0001.xml, PLOT0002.xml, etc.

Warning: The format of V4 plot configuration files is not compatible with the V6 format.