Running FBDI Interactively

This task shows you how to launch FBDI Interactively (for CATIA documents only).


Before you begin:
  • Log on to CATIA or DELMIA V6.
  • Make sure that an environment is selected in the Creation Preferences dialog box.
  1. Select PLM Access > Import > CATIA File...

    In the Files of type scrolling list, you can see the formats of all the documents that can be migrated in V6 by FBDI. The Select File dialog box appears, you can select several V5 documents within the same directory.

    Note: No use of Open as Read only option when using Import from file option in R204.

  2. Select the Product you want to import in V6, in our example: Car.CATProduct.

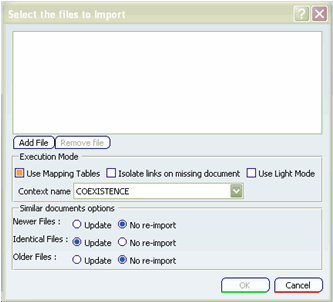
  3. Click Open. The File-based Design Import window is displayed, with the selected .CATProduct file in the list of files to import:

    Note: All the parameters except Use Light Mode option in Select the files to Import dialog box are retained from the previous session of FBDI Import.


  4. Select Importing V5 Data by using Mapping Tables to re-use already imported documents.

    Note: If the Use Mapping Table check box is cleared, no information regarding the document import will be stored. In the further import, it will not be possible to reuse, or to update the already imported documents.

  5. Select Isolate links on missing document to ignore broken links or invalid links which could be contained in your data set.

    It is recommended to always activate this option. Please refer to Importing Infrastructure Links and Data in V6.

  6. Select Use Light Mode to import only the necessary core data of a document thereby ignoring lesser essential data

    Light import is useful when there are some documents that cannot be imported using standard FBDI import. FBDI Light import is also a method to ascertain the core integrity of the data before a standard FBDI import is used for a full and complete import

  7. Select a Context Name from the drop down list.

    This is the string given to the Mapping Table Manager to tag all the Mapping Table elements created by this Manager. So, the Context Name is associated to every components transferred by a Mapping Table Manager. For more details, see About Context Administration.

  8. Similar documents options section has Newer Files, Identical Files, and Older Files options. For each option, you can select one of the following:


    • Update
    • No re-import

  9. Click OK to compute the whole list of documents to import.

    Before the migration is running, the File to Process window is displayed, giving you the list of files to import, that is to say Car.CATProduct and its sub-elements.


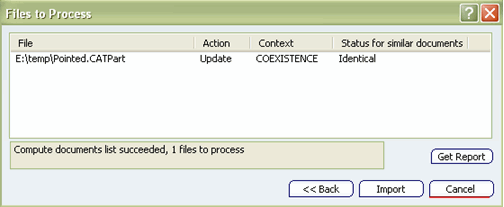
    The following columns are displayed in the Files to Process dialog box:

    • File. Displays the name and path of the file that is being imported.
    • Action. The action column informs the user on how FBDI will treat each document. In this standard mode it will always be valuated as "Import", meaning the document will be treated and imported as new document even if it has been previously imported. You can get others action values when you are working with Importing V5 Data by using Mapping Tables.
    • Context. Displays the name of the context in which the file is imported. Incase of friend contexts, this name may differ from the context selected in Select the files to Import dialog box.
    • Status for similar documents. Displays the status as Identical, Older or Newer if the files processed in FBDI have timestamp that are identical, older, or newer than the similar file previously imported and mapped in the mapping table. "-" is displayed for the documents that are not found in the mapping table.

  10. Click Get Report to see the result of dependency bundle computation.


  11. Click OK to close the Import Report window and return to the Files to Process window.

    For more information, please refer to Visualizing the Report.

  12. Select << Back to change the input files, or click Cancel to abort the Import operation.

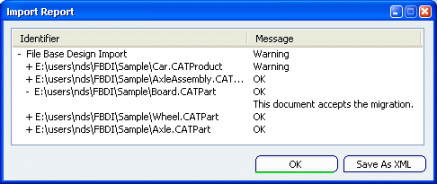
  13. Press Import to run the FBDI tool: the Import Report appears and FBDIDoc_Car opens in V6 at the same time (behind the Report):


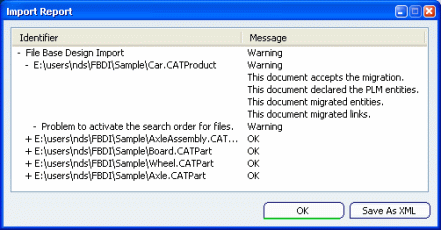
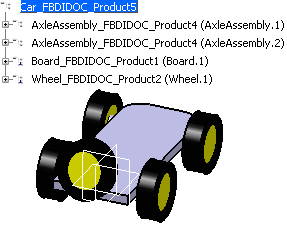
  14. Click OK close the Import Report window and you obtain:

    Important: The Import function creates data within the V6 session, but this data is not automatically saved in database. However, if you are in the Importing V5 Data by using Mapping Tables, data is migrated and automatically saved in ENOVIA.


  15. Select PLM Access > Save to save imported data in ENOVIA database.

    Important: Imported data could request an update.