Exporting Data to 3D XML | |||
| |||
You can access the Export command as follows:
-
From the menu, select PLM Access > Export.
-
In the Data Exchange Toolbar, click the Export icon
 .
.
The Export dialog box appears.

-
Select the Whole structure option if you want to export the visible expanded data from the database.
Note that selecting the Whole Structure option when exporting from the VPM navigation window implies that only visible data is exported when selecting filtered products.
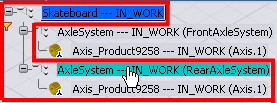
Important: - Exporting a product from the VPM navigation
window implies that the product context is taken into account.
For the given product selection here below only the highlighted
selection will be exported. This behavior applies even if the
Whole Structure option is selected.
- Export options are available only if all data are of the same type (as option are specific to a data type). All data have a default export scope. In case of heterogeneous selection, the default export scope runs.
- Whole Structure check box is available only on data for which expand has a meaning like "product" object.
Important: - If you perform a multiple selection within a Product Structure, the with authoring (*.3dxml) format is applied. (You can not export multiple selected objects to 3D XML using the for review format.)
- All multi-selected exportable entities are exported even if the selected entities are owned by different users.
- Exporting a product from the VPM navigation
window implies that the product context is taken into account.
For the given product selection here below only the highlighted
selection will be exported. This behavior applies even if the
Whole Structure option is selected.
In the Format list select either with authoring, which allows exchanging this data on another site via import, or for review, which allows you to perform a DMU review on the exported file. For more information, see VPM Digital Review > User Tasks > Setting Up Your Session > Importing 3D XML Files.

Important: - If you are exporting multiple objects (using multi-select) only the with authoring option is available.
- It is possible to export a 3D Shape representation for review from the VPM Navigator workbench because representation is exported in context with the root product.
- Favorites cannot be exported.
- Filters and searches can be exported. However, you must take into account that only the results of filters and searches are really exported but not the search of filters components.
- Engineering connections and ports are not exported. They are not a result of a filter execution.
Enter the Path and Name for the exported file. You can browse for the directory using the browse button
 . The name of the exported file is automatically generated based on the display name of the selected object. You can modify it if you want.
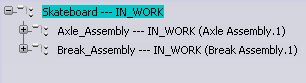
Note: If the same data is selected for export at the same location again, then a number is appended at the end of the name. For example, Skateboard --- IN_WORK[1].3dxml.
If needed, you can edit the properties of the 3dxml file by clicking on the <to be edited> text in any row.
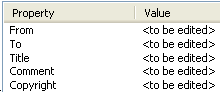
This Id card can be viewed by the receiver before importing the file. You are not required to enter data. Each of these attributes can be filled in with any data you choose. If you do not enter any data, a blank is saved (the text "to be edited" is not saved). The data is embedded in the 3D XML file, therefore, after export, you cannot interactively edit the data.
