Security Overlay | ||
| ||
When you work with suppliers to review a mock-up, you might want to warn these partners that some parts have a certain level of confidentiality. Displaying an overlay enables you to do that.
The overlay works for both 2D and 3D documents, and is also taken into account during capture and print. It is also visible in no show space.
The Security Overlay tab page enables you to:
- define the text that should be displayed
- define the graphical properties and layout of the text
- activate / deactivate the overlay
Each setting can be locked by the administrator.
Important:
|
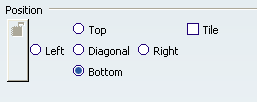
Global

You have the possibility of activating the overlay automatically whenever a document is opened.
- Always activate Overlay when opening a document
-
Select the Always activate overlay when opening a document checkbox to activate the option. Note that it is not necessary to restart your session in order to take into account the modification of this checkbox.
 By default, this option is not selected.
![]()
Text

You define the text that will constitute the overlay.
To define the text explicitly, select Static Text and in the Static Text field, enter the overlay text.
To define a rule-based text, select Rule Based, and in the
Rule Based field, enter the path to the rule-based file to be
used for the generation of the overlay (or click the File Selection icon
![]() and navigate to the rule-based file). For details on how to create a rule-based
file, see Rule-based File for Security Overlay Settings.
and navigate to the rule-based file). For details on how to create a rule-based
file, see Rule-based File for Security Overlay Settings.
| Tip: Click the Rule Based selection button to access a list of recently-used rule-based files. |
- Customize Static Text
-
To customize the textual properties, click the Static Text Customize button. The following panel appears:
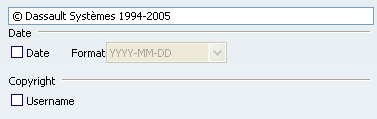
Date
To insert the current date in the overlay text, select the Date checkbox.
By default, this option is not selected.Format
To modify the format of the inserted date, click the Format selection button and choose the desired format from the proposed list.
Copyright Username
To insert your username in the overlay text, click the Username checkbox.
By default, this option is not selected. - Customize Rule Based
-
To customize the textual properties, click the Rule Based Customize button. The following panel appears:
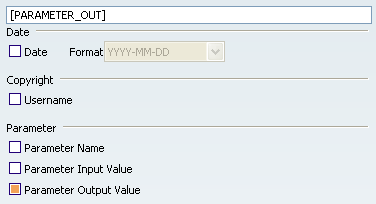
Date
To insert the current date in the overlay text, click the Date checkbox.
By default, this option is not selected.Format
To modify the format of the inserted date, click the Format selection button and choose the desired format from the proposed list.
Copyright Username
To insert your username in the overlay text, click the Username checkbox.
By default, this option is not selected.Parameter
To construct a customized message, check the different parameters in a sequence corresponding to the message you want. Note that between the parameters, you can also add whatever text you want, e.g. "[PARAMETER_OUT] at date [DATE]"
- Parameter Name: name of the parameter searched in the product structure ("ConfLevel" in above example)
- Parameter Input Value: highest value of parameter name found ("4" in above example)
- Parameter Output Value: displayed Security Overlay corresponding to input value)
By default, the Parameter Output Value option is selected, the
other parameters are not selected.
![]()
Global Parameters
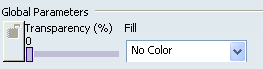
- Transparency
-
The transparency parameter defines the transparency of the overlay fill, 0% is equivalent to no transparency and 100% is equivalent to complete transparency.
To modify the transparency value, drag the Transparency slide button to the desired value.
By default, this option is valuated to 0%. - Fill
-
The overlay fill constitutes a background to the overlay text.
To modify the fill color, click the Fill selection button and choose the desired fill color from the proposed list.
By default, this option is valuated to No Color.
![]()
Text Properties

You can modify the text properties of the overlay text defined above.
- Font
-
Click the Font selection button and choose the desired font from the proposed list.
By default, this option valuated to Swiss.pfb. - Size
-
In the Size text-entry field, enter the desired size or use the increment / decrement buttons until you reach the desired size value.
By default, this option valuated to 20. - Color
-
Click the Color selection button and choose the desired color from the proposed list.
By default, this option is valuated to Yellow.