General | ||
| ||
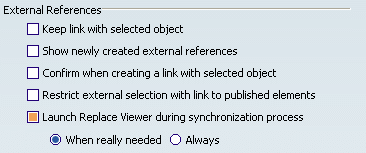
External References
This section describes the various options available in the External References area.

Keep link with selected object
Selecting this option lets you maintain the links between external references, (copied elements and imported elements), and their origins when you are editing these elements.
This option is used as you are editing 3d shapes included in assemblies. For more about designing 3D shapes in assembly context, see the CATIA Assembly Design Users Guide. If later on you need to cut the link between external references and their origin, you just need to use the Isolate command.
![]() By default, this option is not selected.
By default, this option is not selected.
Show newly created external references
If this option is selected, all external references you create from the moment the option is on, are visible in the geometry area. The option does not affect external references created before the option was active.
![]() By default, this option is not selected.
By default, this option is not selected.
Confirm when creating a link with selected object
Selecting this option enables you to be warned that links are created when you are pasting or importing elements from a separate 3D shape. This is the warning message that is displayed:
'Keep link with selected object' option is active. Do you want to keep the link with the selected object?
When Keep link with selected object is cleared, Confirm when creating a link with selected object remains available (can be selected or not). As some commands override the keep link with selected object status, a confirmation window may be displayed.
![]() By default, this option is not selected.
By default, this option is not selected.
Restrict external selection with link to published elements
Select this option if you want to allow only published elements to be selected as external geometry. This restricts and therefore controls the selections that can be made when selecting elements belonging to a different 3D shape.
If Keep link with selected object is not on, although selected, this option has no effect.
![]() By default, this option is not selected.
By default, this option is not selected.
Launch Replace Viewer during synchronization process
This option lets you contribute to the external reference synchronization processes. If selected, the Replace Viewer dialog box can appear during interactive synchronizations launched via commands such as Edit Links. Additionally, the Replace Viewer dialog box will appear under certain conditions: You can chose when the Replace Viewer dialog box opens:
- Only when needed: the Replace Viewer dialog box is displayed only when the synchronization cannot solve issues in a logical way and therefore requires the user's control.
- Or always: full control is allowed to you during the
synchronization process. In concrete terms, the Replace Viewer
dialog box is almost always appears. The only cases when it is not displayed is when the external reference is of dimension 0 (for instance,
a point) or 3 (a solid feature) and has no pointed sub-elements.
Note: In the Replace Viewer dialog box, you can manually reroute the impacted features on the geometry of its new inputs. In an assembly context, the products impacted by the publication changes are computed and rerouted after synchronization. Therefore, the Replace Viewer dialog box remains unavailable when a product publication reference is changed.
![]()
Update
This section describes the various options available in the Update area.

Automatic/Manual
Select Automatic if you want 3D shapes to be updated automatically. Conversely, check Manual if you wish to control your update operations.
![]() By default, the Automatic option is selected.
By default, the Automatic option is selected.
![]()
Delete Operation
This section describes the various options available in the Delete Operation area.

Display the Delete dialog box
Check this option if you wish to access filters for deletion (see "Deleting Features" in the Part Design Users Guide).
![]() By default, this option is selected.
By default, this option is selected.
Delete exclusive parents
Check this option if you wish to delete the parents of the features you are deleting. The parents will be deleted only if they are exclusive, in other words, if they are not shared by other features. Conversely, if they are shared by other features they will not be deleted.
When this setting is active, the option is selected in the Delete dialog box. Even if the option is selected in the Delete dialog box, you can uncheck it if you wish to. If Display the Delete dialog box is not selected, this setting has no effect. For more information, refer to Deleting Features in the Part Design Users Guide.
![]() By default, this option is not selected.
By default, this option is not selected.
![]()
Replace
This section describes the various options available in the Replace area.

Do replace only for elements situated after the In Work Object
Checking this option makes the Replace... operation possible only for features located below the feature in Work Object and in the same branch. This option is available for bodies and ordered geometric sets, not for solid bodies.
![]() By default, this option is not selected.
By default, this option is not selected.