Navigation | ||
| ||
Selection

- Preselect in geometry view
-
Activates preselection highlighting. As you point to objects, different parts of the objects are highlighted in the geometry area, and the object name is highlighted in the specification tree. However, note that deactivating this option impacts all commands using prehighlight, especially the Other Selection... command that does not work anymore.
 By default, this check box is selected.
- Preselection navigator after ... second(s)
-
Sets the amount of time, in seconds, which elapses before the preselection navigator appears when pointing at an object:
See Infrastructure User's Guide: Selecting Objects: Selecting Using the Preselection Navigator for more information.
By default, this check box is cleared.
- Highlight faces and edges
-
Controls the way faces and edges are prehighlighted and highlighted.
How elements are prehighlighted and highlighted varies according to the current visualization mode: Shading with Edges, Shading, Wireframe (NHR), Dynamic hidden line removal (HRD). Note that some minor differences in the way elements are highlighted are noticeable using the HRD mode.
The default prehighlight and highlight colors are different, and can be customized using the Visualization tab. By default, faces and edges are highlighted. Depending on the element type, elements may or may not be displayed using the Z-buffer.
The following examples use the shading mode.
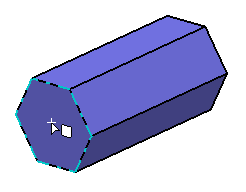
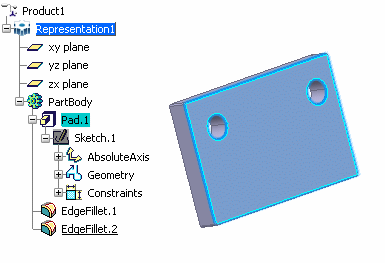
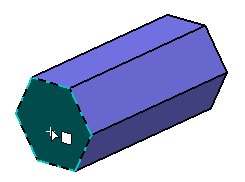
When you are editing an object, a selected face is highlighted like this:
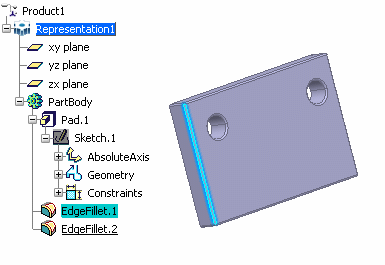
... and a selected edge is highlighted like this:
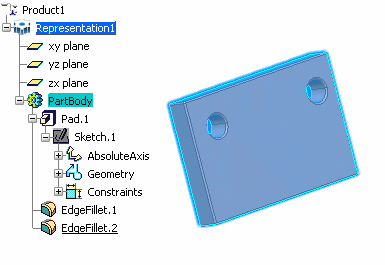
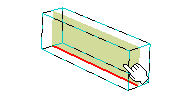
If you select the Pad or the PartBody in the specification tree, the whole object is highlighted like this:
Warning: This option has no impact on bodies with no edges: when you highlight the whole body, all its faces are highlighted, even if the Highlight faces and edges option is cleared. This does not apply to bodies whose edges are hidden.
By default, this check box is cleared.
- Display manipulation bounding box
-
When clicking an object, displays a bounding box around
the selected object if it uses manipulators:
The bounding box takes into account the assembly constraints of the object.
Objects using manipulators can be manipulated by the Robot. For more information, see Infrastructure User's Guide: Using the Robot: Manipulating Objects Using the Mouse and Robot.
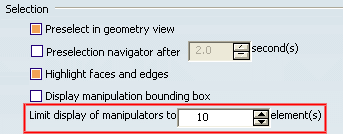
By default, this check box is cleared. - Limit display of manipulators to ... element(s)
-
Sets a limit on the number of elements selected in multi-selection mode (using the selection trap) on which manipulators can be displayed.
In case you select more elements than the limit (for example, by pressing Ctrl to extend the selection), no element can be manipulated.
This option also optimizes the selection when large amounts of elements are involved. The consequence is that the selection becomes faster but also less accurate. Therefore, when the limit is exceeded, some selected elements may not be highlighted and the manipulators may not be displayed and this, even if the number of selected elements is reduced afterwards.
This option is activated when working in a 2D context (objects with handles such as texts and arrows, for instance) or 3D context.
The following scenario takes the Drafting application as an example:- Enter a value in the Limit display of manipulators box,
10 for
instance then click OK to validate.
Warning: Setting a high number (greater than 50) has an impact on the contextual menu displayed when right-clicking a selected element: in that case, the contextual menu is not displayed anymore. To be able to display the contextual menu, set the limit to a higher number. If the number of selected elements is not higher than 50, the contextual menu is always displayed even though the limit has been set to a lower value.
- In the geometry area, select six elements either using the selection trap or by pressing Ctrl. As you can see below, manipulators are displayed on the selected elements to let you modify them:
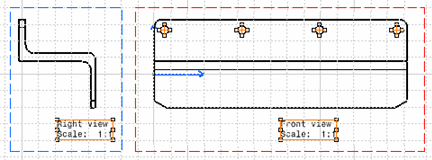
If you set the limit to 5 instead of 10, no manipulator is displayed since the number of selected elements (i.e. six) exceeds the limit:


- Enter a value in the Limit display of manipulators box,
10 for
instance then click OK to validate.
- Display immersive list for the preselection navigator
-
Displays the list of all the elements you can preselect when using the preselection navigator. The immersive list displays all the stacked elements you can preselect:
This information is identical to the one displayed in the status bar.
If you do not want to display the immersive list, deactivate the option.
By default, this check box is activated. - Display auxiliary viewer for preselection navigator
-
Activates an auxiliary viewer displaying the preselected object when using the preselection navigator:

This viewer enables you to perform viewing operations with the mouse such as zoom, rotate or pan.
By default, this option is cleared. - Prehighlight faces for preselection navigator
-
Activates the highlight of the faces you preselect using the preselection navigator:
 By default, this check box is cleared.
- Display immersive viewer for preselection navigator
-
Activates the display of the immersive viewer when using the preselection navigator. The immersive viewer provides a visual feedback on the preselected element and lets you validate your selection.
This circle with an opaque backgroud shows the preselected element and displays the surrounding elements in transparency:
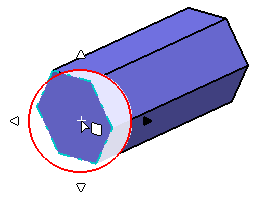
A cross pinpoints the preselected location. Four arrows are used for navigating or scrolling through the object you point at. These arrows turn black when you reach an extremity.
This viewer keeps the proportions of the current viewer.
By default, this check box is selected.
![]()
Navigation
- Gravitational effects during navigation
-
Fixes the X, Y or Z axis during navigation. While turning in Fly mode, this creates the impression that the user viewpoint tilts or banks with respect to the fixed axis, as in a real plane.
By default, this check box is cleared. - Follow ground at altitude (in mm)
-
First, select the Gravitational effects during navigation check box to be able to activate this option. When flying and walking, this gravitational effect makes you automatically fall if you do not reach the specified altitute (in millimeters). This allows you to follow the ground relief, such as stairs.
An altitude set to "0" means that the eye level is set at ground level, whereas an altitude higher than "0" will set the eye level above ground level.
Note that the Follow ground at altitude check box is automatically cleared when it is not relevant, i.e. when no ground is detected.
By default, this check box is cleared. - Animation during viewpoint modification
-
Set this option if you want viewpoint changes in certain contexts to be animated. To see an example of the effect of this option, click the option, then select a plane and click Sketch. The selected plane is slowly rotated until parallel to the screen just like during an animation. If you do not select this check box, the selected plane is set parallel to the screen immediately (without the animation effect).
Note: the visualization time of the product impacts the number of animation steps. The longer the duration, the less steps. In case the visualization takes too much time, there is no viewpoint animation at all.
By default, this option is activated. - Disable the rotation sphere display
-
Hides the rotation sphere usually displayed when rotating an object. The result is as shown below.
Rotation sphere activated:
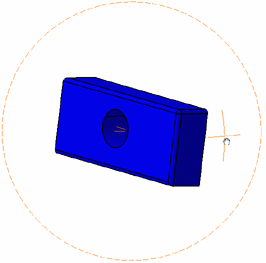
Rotation sphere deactivated (default mode):
 By default, this option is activated.
![]()
Fly/walk
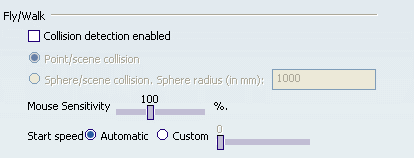
- Collision detection enabled
-
Select this check box to
activate the following two options:
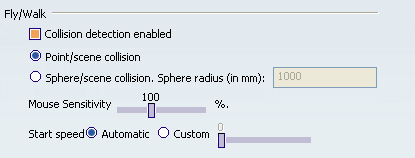
- Point/scene collision
-
When flying and walking, detects if you collide with an object, so that you bounce off the object instead of going through it. This is the default option.
By default, this check box is selected.
- Sphere/scene collision
-
Works the same way as Point/scene collision but this time, the user is modelized as a sphere whose radius can be defined by entering a value (in millimeters) in the box to the right. When flying and walking, the option detects if the sphere collides with an object, so that you bounce off the object. As no object can break through the sphere, this provides a more "immersive" experience.
Note that this detection collision mode works with complex geometry since it is based on visualization triangles. Note also that, when used in combination with Follow ground at altitude, this option can provide video game Quake-like navigation effects.
However, bear in mind that there is a price to pay in performance when using large models.
By default, this check box is cleared. - Mouse Sensitivity
- Sets the mouse sensitivity when flying and walking: if you set a low value, pointing the cursor produces only slow, minor changes in direction; if you set a high value, pointing the cursor produces rapid, significant changes in direction.
- Start Speed
-
When you begin to fly, this option lets you choose between two options:
- Automatic: you begin to fly at the default speed, i.e. the
speed at which you first approach the object depends on the initial
distance from the object and is calculated automatically.
By default, this check box is selected.
- Custom: you can define by yourself the speed at which you
first approach the object using the slider.
By default, this check box is cleared.
- Automatic: you begin to fly at the default speed, i.e. the
speed at which you first approach the object depends on the initial
distance from the object and is calculated automatically.
![]()
Mouse Speed

Sets the time interval (from 0 to 100 milliseconds) during which mouse movements are not taken into account for prehighlight purposes: the higher the speed, the fewer elements are prehighlighted.
![]()
Angle value for keyboard rotations

Sets the value of the angle applied when rotating objects using the keyboard (such as pressing Shift and the up arrow to rotate the object about the X axis). For more information about how to perform rotations using the keyboard, see Infrastructure User's Guide: Viewing Objects: About Viewing Objects: Viewing Tools.
The default angle value used for keyboard rotations is 9 degrees. This means that until now, if you wanted to perform a rotation of 180 degrees for instance, you had to press 20 times the corresponding keyboard shortcut.
This option lets you choose the angle value to be applied when performing rotation operations. This lets you perform smaller or greater rotations by pressing a key combination only once. This also facilitates the navigation in the model by minimizing the number of interactions. To set the angle value, click the up or down arrow until you reach the desired value, or enter your value directly in the box. Available values range from 0 degrees (no rotation) to 360 degrees (full rotation about one axis).
By default, the angle value is set to 9 degrees.