Graphics Formats | ||
| ||
Import (Viewer)

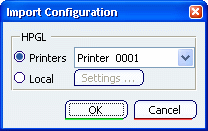
This area lets you choose the pen characteristics to be taken into account when opening an HPGL document.
Note that except in raster format, the viewer does not support documents with multiple sheets.
To define the pen characteristics, click Configuration... then select the appropriate option:

- Printers
-
This option is activated provided that at least one HPGL printer has been setup.
If this option is selected, it means that the HPGL viewer uses the pen configuration of the HPGL driver selected in the pulldown list on the right ("Printer 0001" in the picture above).This ensures a coherence between the selected HPGL printer and the advanced configuration parameters defined in the printer properties.
- Local
-
This option is relevant when no specific HPGL printer has been defined. If this option is selected, it means that the HPGL viewer uses the local pen settings defined in the HPGL Configuration dialog box.
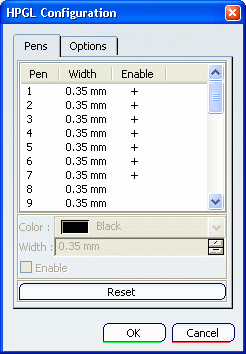
To access this dialog box, click Settings... (which is activated as soon as you select Local):

The HPGL Configuration dialog box lets you define the characteristics of the pens that will be used to create a mapping between the original V6 document and the result in HPGL format.
See the configuration scenario dedicated to HPGL printers (Infrastructure User's Guide: Techniques: About Printing: Configuring Printer Drivers) for more information about how to define advanced HPGL configuration parameters.
When finished, click OK to validate and close the HPGL Configuration dialog box.
![]()
Export (Save As)

This category of options lets you define the advanced configuration options to be applied to the drivers listed below when saving a a drawing representation to another format using PLM Access > Export....
The purpose is to prepare your documents for printing by configuring the driver corresponding to the file format in which your document will be saved.
For more information about exporting drawing representations to other formats, see Infrastructure User's Guide: Importing/Exporting: Exporting Objects to Other Formats: About Exporting Drawing Representations to Other Formats.
- Properties
-
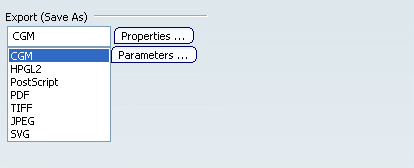
In the pulldown list, select the format in which the drawing representation will be saved then click Properties... to define the corresponding configuration parameters.
The look and content of the dialog box varies according to the format you select:
- CGM
- HPGL2
- PostScript
- Raster
- SVG
For detailed information, see Infrastructure User's Guide: Techniques: About Printing: Procedure for Configuring Printer Drivers.
- Parameters
- You can define general parameters.
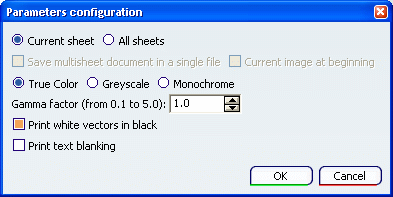
In the pulldown list, select a format then click Parameters...:

- Current sheet
- If this option is selected, only the current sheet of your drawing representation will be saved when exporting the document to
another format using .
 By default, this option is selected.
 - All sheets
- If this option is selected, all the sheets of your drawing representation will be saved when exporting the document. You can choose to store them all in the same file by selecting the Save multisheet document in a single
file option.
 By default, this option is cleared.
 - Save multisheet document in a single file
This option is available only when the All sheets option has been selected. If the format you selected does not support this capability, the option remains grayed out (which is the case for the JPEG format).
If this option is selected, all the sheets of your drawing representation will be saved in a single file. Note that the only V6 viewer supporting multisheet information is the TIFF viewer.
If the option is cleared, only the current sheet will be saved in the generated file.
 By default, this option is cleared.
- Current image at beginning
- This option is available only when Save multisheet
document in a single file is selected.
If this option is selected, the current sheet of the drawing representation will be displayed at the beginning of the generated file.
If this option is cleared, the sheets will be saved in the same order as in the drawing representation.
 By default, this option is cleared.
- True Color, Greyscale, Monochrome
- True Color: original colors are kept.
- Greyscale: colors are converted to greyscale. This creates a smaller print file.
- Monochrome: all non-white colors are converted to black.
 By default, True Color is selected.
- Gamma factor
- Lets you define the gamma factor to be applied. A gamma factor of 0.1 produces a dark image, whereas a factor of
5.0 produces a lighter image.
 By default, the Gamma factor is set to 1.
- Print white vectors in black
- If this option is selected, the color of white vectors is converted to black so that they are visible when printed on a white paper.
 By default, this option is selected.
- Print text blanking
- If this option is selected, the blanking of texts is printed.
 By default, this option is cleared.
Important:
In this tabpage, you can also
|