Creating a Camera

You can create a camera and handle its specifications.

The camera enables you to specify a viewpoint from which a photorealistic image will be computed.

The following topic is discussed:

This task shows you how to:

Related Topics
Adjusting Camera Parameters
More about Creating a Camera

Creating a Camera

You can create a camera.

  1. Click Create Camera.

    The camera is created at the current viewpoint.

  2. Click the Camera item in the specification tree and rotate the model to see the camera symbol:


    This standard visualization is not affected by any change of scale ("zoom").

  3. Use the two spheres and the two squares displayed in green on the 3D representation to interactively manipulate and position the camera.

    This visualization is affected by changes of view scale (zoom) and is activated when selecting a camera in the scene or in the specification tree. Otherwise, all elements are set to the standard visualization.
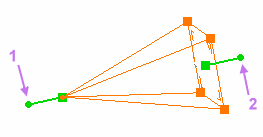
    Conical camera

    Pyramid height = focal length

    and

    Pyramid base = film dimensions
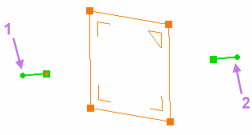


    Cylindrical camera

    Plane = film dimensions

    • The source point (1) rotates the camera around its target point.
    • The target point (2) rotates the camera around its source point.
    • The source green square translates and rotates the camera around its target point.
    • The target green square translates and rotates the camera around its source point.

    Cameras are needed to render and view a scene. "An image is worth a thousand words": the better the camera is positioned, the more accurate the saying.

  4. To hide the camera representation, right-click the camera in the specification tree then select Camera object > Hide/Show Representation. Inversely, this command lets you show a hidden representation.

    Important:
    • You can create several cameras at different locations to have different viewpoints.
    • The camera which is taken into account to render a given image is said to be active. Any other camera is inactive. Note that some of the adjustments detailed in this scenario can also be performed using the camera contextual menu. For more information, see More about Creating a Camera.

Open a New Camera Window

You can open a new camera window.

  1. If you want to position yourself behind the camera and observe the captured image, select Window > Camera Window > Camera.x: a new window displaying the camera viewpoint opens. When you manipulate the handler in this window, the camera is simultaneously positioned in the main window.

    You can choose three arrangements for the opened windows, i.e. horizontal, vertical and cascading by selecting the following commands from the menu bar:


    • Window > Tile Horizontally
    • Window > Tile Vertically
    • Window > Cascade

  2. To close the camera window, you can either click the cross in the top-right corner of the window or reselect Window > Camera Window > Camera.x.