Applying Material to Routables | ||
| ||
Add Material
You can add material in Project Resource Management.
Create all material objects you need and save in the database. For more information, see Client Collaborative Platform : Virtual Product Modeling: Material Definition.
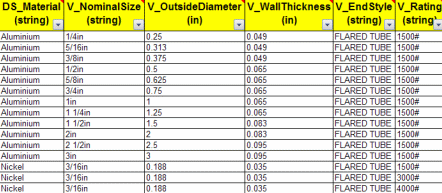
Create supporting tables, such as Pipe Reference Definition table, Turn Rules table, Minimum Tangent Length table, and Pipe Fabrication End Style table. For more information, see Design Rules and Standard. The image below gives an example of the Pipe Reference Definition table.
Important: Ensure that names in the DS_Material column of the tables match the material names in the database.
![]()
Apply Material to a Route
When you select standard in the Routing Information dialog box, supporting tables and design rules are filtered based on the selected standard. You can assign material to the route by selecting the appropriate row from the Pipe Reference Table.
In the Fluid Systems Detail Design workbench, click Rigid Route
 in the Compass Toolbar.
Go to the balloon and click Select
 > Edit Properties
 .
.The Routing Information dialog box appears.
Click Route Size Table
 .
.The Pipe Reference Table appears.
Note:
- The Material column is optional in these tables. You will be able to route a pipe even if you do not apply material to the pipe. In this case, Nominal Size alone will be used as the filtering criteria.
- The End Style
 material is determined when choosing the material for the route.