The Replace command Access and Dialogs | ||||||
|
| |||||
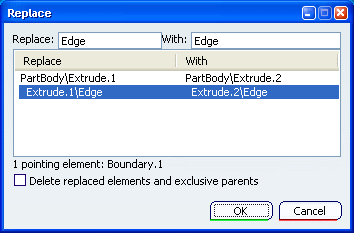
Replace:
- Replace
- The left part of the dialog shows all the elements that are to be replaced .
- With:
- The right part shows all the elements that will be replacing them.
- Delete replaced elements and exclusive parents
- The replaced geometry will be deleted at the end of the command.
 By default,
the first line indicates the feature on which the replace operation is launched (In our case, PartBody\Extrude.1). All the consecutive lines show the sub elements of the replaced feature that are referenced by other features of the representation. (e.g. Extrude.1\Edge is referenced by Boundary.1).
By default,
the first line indicates the feature on which the replace operation is launched (In our case, PartBody\Extrude.1). All the consecutive lines show the sub elements of the replaced feature that are referenced by other features of the representation. (e.g. Extrude.1\Edge is referenced by Boundary.1).
Notes:
- The Replace command can be used on the feature which are referenced to create other features in the representation context.
- In some cases, an element to replace may not be directly referenced by an other elements in the context, however its sub-elements could be referenced by other elements.
![]()
The Replace Viewer Dialog box
Once the replacing feature is selected, features that referenced the sub elements of the replaced feature need to be rerouted on sub elements of the replacing geometry. In such case, the Replace Viewer dialog box appears and allows you to specify on which sub elements of the replacing feature the concerned features need to be rerouted on.
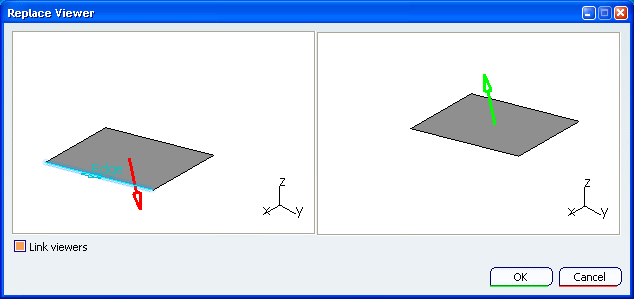
The Replace Viewer dialog box consist of two windows:
- The left window displays the old geometry, the geometry of the element which is to be replaced.
- The right window displays the new geometry, the geometry of the replacing element.
The highlighted edge in the left window represents the sub-element that is referenced by an other elements in the representation. You can specify the corresponding replacement edge in the right window.