Using Offset Planes | |||
| |||
The Define Plane dialog box is displayed. It provides sophisticated ways to define a plane by means of origin, orientation and other parameters.
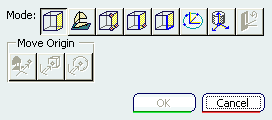
Use the Mode buttons to define the plane:
- Click Define Plane
 to
redefine the plane as well as the origin by clicking once on the face.
to
redefine the plane as well as the origin by clicking once on the face.
- Click Define Plane using Compass
 to redefine the plane using the compass.
 - Click Define 3-point Plane
 to define the plane by clicking on any three points with your pointer.
The connector is placed on the first point you click.
to define the plane by clicking on any three points with your pointer.
The connector is placed on the first point you click. - Click Define Line-Point Plane
 to select the plane by clicking on a point and a line, like an edge.
The connector is placed on the first point you click.
to select the plane by clicking on a point and a line, like an edge.
The connector is placed on the first point you click. - Click the Define Line-Line
 to
select the plane by clicking on two lines. The plane is defined
by the first line selected. But if the two lines are parallel the plane
is defined as the plane in which both lines exist.
to
select the plane by clicking on two lines. The plane is defined
by the first line selected. But if the two lines are parallel the plane
is defined as the plane in which both lines exist. - Click Define Plane at Center of Circle
 to select the plane by clicking three points on the edge of a circle.
This method is used for multi-CAD documents, usually for CGR circles.
You can click at points where two lines meet or in the center of a face.
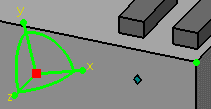
The Z axis of the plane manipulator is placed according to the
right hand rule. If you click clockwise the Z axis points
into the object. If you click counter clockwise the Z axis points
out from the object.
to select the plane by clicking three points on the edge of a circle.
This method is used for multi-CAD documents, usually for CGR circles.
You can click at points where two lines meet or in the center of a face.
The Z axis of the plane manipulator is placed according to the
right hand rule. If you click clockwise the Z axis points
into the object. If you click counter clockwise the Z axis points
out from the object. - Click Define Plane at Product Origin
 and then the object to place the plane manipulator on the origin of
the object. The plane manipulator axis matches that of the product.
and then the object to place the plane manipulator on the origin of
the object. The plane manipulator axis matches that of the product. - Click Define Orientation
 to
change the orientation. Click the button and then click a point or a
line. If you click a point the X axis that points to it. If you click
a line the X axis it becomes parallel to the line.
to
change the orientation. Click the button and then click a point or a
line. If you click a point the X axis that points to it. If you click
a line the X axis it becomes parallel to the line.
- Click Define Plane
Use the Move Origin buttons to define the origin.
- Click Define Origin at Plane or Compass
 to define the origin using the compass or plane command. You use the
compass or plane as the base plane along which the origin can be selected.
to define the origin using the compass or plane command. You use the
compass or plane as the base plane along which the origin can be selected.
- Click Define Origin at Point or Center of Face
 to define the origin by clicking on a point or face.
 - Click Define Origin at Center of Circle
 to define the origin by clicking at three points. The origin is
placed in the center of an imaginary circle drawn using those three
points. The plane and orientation doesn't change when using this command.
to define the origin by clicking at three points. The origin is
placed in the center of an imaginary circle drawn using those three
points. The plane and orientation doesn't change when using this command.
- Click Define Origin at Plane or Compass
Click OK once you are done defining the plane.
The white rectangle changes to a blue rectangle, and remains displayed on the reference element, as shown below.
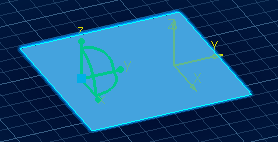
The reference plane can now be used as a reference to position other elements. For example this plane is used as reference when you use Align Sides command.
When you are done with positioning and do not need the reference plane any more, you can destroy it by launching the Define Plane command and clicking Cancel in the dialog box.
 .
.