You can analyze view geometries using the sketch analysis.
Click Sketch Analysis
 in the Sketch Solving Status dialog box or select Tools >
Sketch Analysis.
The Sketch Analysis dialog box appears. It contains three
tabs: Geometry, Use-edges and
Diagnostic.
Construction elements appear in blue in the geometry.
Note that by clicking
the appropriate tab, you can sort
the elements displayed in the dialog box by name, status or type. You can select elements from the dialog box and they
will be highlighted in the geometry area.
In the Sketch Analysis dialog box, the Geometry
tab displays information about all the connex profiles in the view.
General Status: global status on all the view
geometries.
Detailed Information: provides a
detailed status/comment on each profile of the view.
Corrective Actions: according to
the analyzed element you select and which is not correct, you will be able
to:
-
 :
turn this element into a construction element,
-
 :
close a profile that is not,
-
 : erase
a disturbing element,
-
 :
hide all constraints in the view,
-
 :
hide all construction geometries in the view and in the detailed information
area of the Geometry tab.
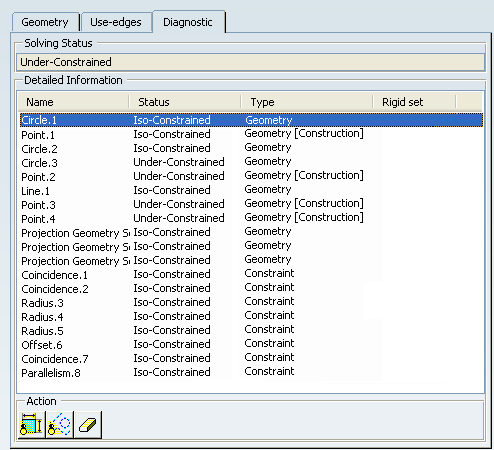
Click the Diagnostic tab. It gives information
about every element of the geometry or constraint of a view.

The information on this tab displays a full
diagnosis of the view geometry. It provides a global analysis of the view
as a whole, and specifies whether individual geometrical elements in the
view are under-constrained (under-defined), over-constrained (over-defined)
or iso-constrained (well defined):
Solving Status: provides a quick overall analysis of the
view geometry.
Detailed Information: provides a detailed status on each
constraint and geometrical element of the view, and lets you know what
type of element it is (geometry, constraint).
Action: according to the analyzed element you select, you
will be able to:
-
 :
hide all constraints in the view and in the detailed information area.
-
 :
hide all construction geometries in the view and in the detailed information
area of the Diagnostic tab.
 erase geometry.
Select Hide Construction Geometries
 in the Sketch Analysisdialog box.
All the construction elements are hidden both from the dialog box.
If you select items in the Detailed Information
table, they will be highlighted in the view, which enables you to identify
them easily. To solve constraint-based problems in the view, you need to
edit the geometry directly.
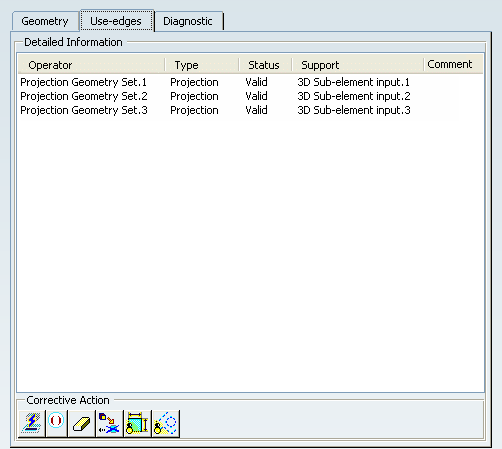
Click the Use-edges tab.
It gives
information on each projection or intersection, on constraints and so forth
created in the view.

You can sort the use-edges by type, build
or update status or input geometry.
Detailed Information: provides
a detailed status/comment on each use-edge of the view.
Corrective Action: according
to the analyzed element you select and which is not correct, you will be
able to:
-
 :
isolate the associative use-edge making it non-associative with geometry.
-
 :
remove the associative use-edge from update process (the use-edge is
still associative to geometry but is not updated).
-
 : erase
the use-edge.
-
 :
change the input geometrical object projected or intersected (this option
is not available in 2D Layout, it is grayed out.
-
 :
hide all constraints in the view.
-
 :
hide all construction geometries in the view and in the detailed information
area of the Geometry tab.