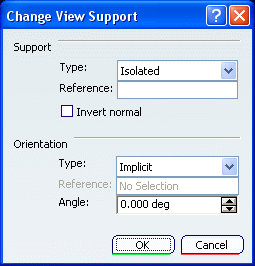
Change View Support Dialog Box | ||
| ||

Support
Changes the support type or reference support of the view.
- Type
-
The options in the Type combo box are as follows:
- Associative
- Associates the view with another reference support. In this case, you will not be able to change the view orientation.
- Isolated
-
Isolates the view from its reference support.
Note: This is the compulsory view type for axonometric views.
- Reference
- Changes the reference support of the view.
- Invert Normal
- Inverts the normal of the view. You can also invert it by clicking the view normal in 3D.
![]()
Orientation
- Type
-
Specifies the orientation type of the view plane definition.
Important: - If you select an incorrect orientation type, an error message is displayed and the orientation type is set back to Implicit mode.
- The reference linear elements and surfaces can be selected from any part of the edited 2D Layout or from 3D view background (except for the background of the new view during its creation).
The options in the Type combo box are as follows:
- Implicit
- Optimizes the orientation automatically. This is the default mode.
- X Axis
- Orientates the horizontal axis according to the X axis representation when possible.
- Y Axis
- Orientates the horizontal axis according to the Y axis representation when possible.
- Z Axis
- Orientates the horizontal axis according to the Z axis representation when possible.
- Parallel to line
- Orientates the view parallel to a linear element. The linear element is projected onto the view support. If the projection results in a line, the H axis of the view becomes parallel to the projection. Otherwise, the view orientation remains unchanged (i.e. the projection results in a point).
- Normal to surface
- Orientates the view normal to a surface. The normal of the surface is projected onto the view support. If the projection results in a line, the V axis of the view becomes parallel to the projection. Otherwise, the view orientation remains unchanged (i.e. the projection results in a point).
- Reference
-
Specifies the reference element selected for the Parallel to
line and Normal to surface orientation types.
Important: - If you selected the Parallel to line orientation type, some elements which are seen as a line in a view background (circle, ellipse, spline, etc.) cannot be selected as they are not linear elements.
- There is no associativity between the view and the reference linear element or surface.
- Angle
-
Specifies the angular value for view orientation.
The view is rotated by the specified angle, counter-clockwise around the view support, normal from the support basic orientation.
Important: - The angle of the view in the sheet is independent from the 3D angle.
- The specified value is not persistent.