Measuring | |||
| |||
 and
and  tools are visible in the workbench (if necessary, to make the tools visible, click
 Measure an Object
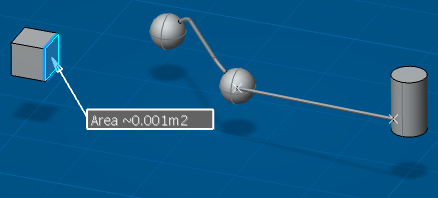
This section describes how to use Measure Item to measure a logical object in the 3D view.
- The cursor changes to
 .
. - The Measure Item dialog box appears.
- The cursor changes to
In the Specifications tag of the dialog box:
- Click
 to measure a single item or
  to measure multiple items.
 - In the Mandatory area Calculation mode box, select Exact else approximate (other choices are Exact and Approximate).
- In the Parameters area Selection mode box, select Any geometry (other choices exist and help you to refine your selection).
- Click
Select an object in the 3D area. If you want to select more than one object, click
 and then add (or remove) objects in the Measure Selections dialog box.
Note: If more than one object is selected, the parameter value displayed will be the combined value for all objects selected and the type of object picked first determines the selection for the others. You cannot multi-select objects if you chose
to measure multiple items.- The object (or objects) is added to the Mandatory area Selection box.
- An information box appears in the 3D area and displays the value of the parameter being measured.
Move the cursor in the 3D area and click to fix the position of the information box.
![]()
Measure Between Objects
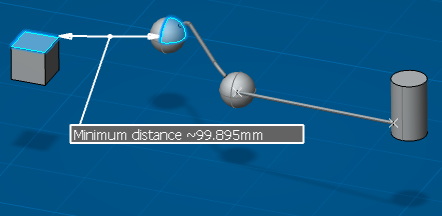
This section describes how to use Measure Between to measure distances between logical objects in the 3D view.
- The cursor changes to
 .
. - The Measure Between dialog box appears.
- The cursor changes to
In the Specifications tag of the dialog box:
- Click
 to measure a single item,
  to measure multiple items,
  to measure multiple items from a single point or
  to measure items in a chain.
 - In the Mandatory area Type of measure box, select Minimum distance (other choices exist).
- In the Mandatory area Calculation mode box, select Exact else approximate (other choices are Exact and Approximate).
- In the Parameters area Selection 1 mode and Selection 2 mode boxes, select Any geometry (other choices exist and help you to refine your selection).
- Click
Select an object in the 3D area. If you want to select more than one object, click
and then add or remove objects in the Measure Selections dialog box.Note: If more than one object is selected, the parameter value displayed will take into account the group of objects selected.
- In the Mandatory area the object (or objects) is added to the Selection1 box.
- The cursor changes to
 .
.
Move the cursor in the 3D area and click to fix the position of the information box.
Note: You cannot save the measurement values provided by the Measure Item and Measure Between commands; the values are not persistent.