Click  and select Knowledgeware > Rules > Knowledge Expert.
Click Expert Check
 .
.
Select the Rule Base relation in the
specification tree.
The Expert Check Editor dialog box is displayed.
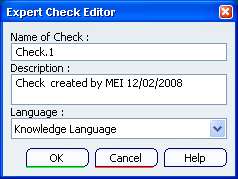
If need be, replace the default name and description
of the check to be created, the description will be displayed at
the first line. Select the Knowledge Language, then click OK.
The Expert Check Editor is displayed.
Enter the
H:Hole statement in the
 area to specify that the check is to be applied on all the holes
and that H will be used as a variable. To do so:
area to specify that the check is to be applied on all the holes
and that H will be used as a variable. To do so:
- Double-click <Add new argument>
and enter H.
- Select the Hole type in the Type scrolling list.
- Click Apply.
Copy/Paste the code below from your browser to the
edition box:
(H.Diameter
== 11.0 mm) AND (H.Activity == TRUE)
Click OK.
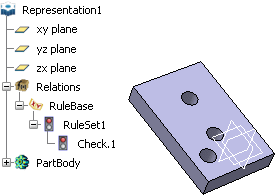
A check is added to the rule
base in the specification tree.
Note:
To get a full description of the
available types, see the Reference Information section
of this guide.
Click Solve
 to solve the Rule Base.
The light icon associated with the check has turned
to red, indicating that the check is not valid (all the holes have
a diameter of 10.0mm).
Right-click the check in the specification tree,
and select Highlight Failed Component. This highlights
the features that don't fulfill the criteria specified in the check.
Note:
You can edit the check name after creating the check.
To do so, proceed as follows:
- In the specification tree, select the
Check, and select Edit > Properties or Alt >Enter.
- Modify the Check name in the editor.
You can also edit the check comment. To
do so, proceed as follows:
- Select the Check, and select Edit >
Properties.
- Modify the Check comment in the editor.
This modification does not modify the comment in the
body field of the Expert Check Editor but it modifies
the Check Report.