Knowledge Expert Language | ||
| ||
Selecting a Language
You can select a language.
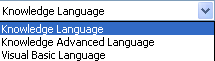
When defining rules in Knowledge Expert, you can use two languages:
-
Knowledge Language
-
Visual Basic Language
When defining checks in Knowledge Expert, you may use three languages:
 |
|
![]()
Declaring Variables
You can declare Variables.
in the For All field
|
|
Rules and checks variables are declared in the For All field. |
Note that:
-
Variables must comprise letters and/or digits.
-
Variable names have no size limitation.
-
Variable names are case-sensitive character strings.
-
Variable names must not conflict with unit names. To get an exhaustive list of the units supported by Knowledge Expert, see the Units field of the Knowledge Expert browser in the Expert Check/Rule Editor.
-
Types starting with a digit (2DCircle) or containing a special character (+,-,...) must be written as follows: %2DCircle%, % acting like delimitators.
Important: When using KWE language, you may now declare autoreferencing variables in the Check or the Rule body by using Thisrule or Thischeck. For more information, see Accessing the Expert Check in the Check Body.
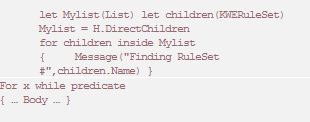
In the Check Body
Temporary variables can be declared by using the keyword. A temporary variable does not persist as a parameter after the check/rule execution is finished.
let Mylist(List)
						let childrenCheck(KWECheck)
						let i = 1
						let condition = 0
						Mylist = H.DirectChildren
						for i while condition == 0 AND i <= Mylist.Size()
   {
    childrenCheck = Mylist.GetItem(i)
    if (childrenCheck.Name == TargetCheck)
     {
       ThisCheck.AddTupleFailed(childrenCheck)
       condition = 1
     }
						else
      {
       ThisCheck.AddTupleSucceeded(ChildrenCheck)
      }
} |
![]()
Using Types
You can use Types.
The types described below are those you can use in the Expert Rule Editor or in the Expert Check Editor by using the Object Browser.
In the
![]() (For all) field, use the following syntax:
(For all) field, use the following syntax:
Idenntifier:type_name
- where type_identifier corresponds to the variable you want to declare and type_name stands for the type to be declared, available in the Browser.
- Note that you can insert feature names (types) by keying them in the For all field, by selecting them in the Expert Check/Rule Editor browser or by clicking the features in the geometry window or in the specification tree.
![]()
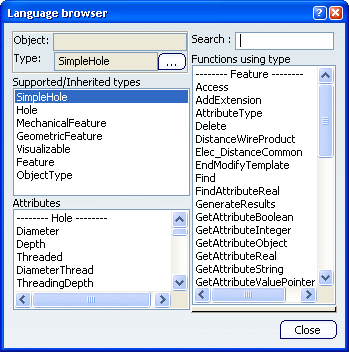
Using Types Attributes
You can use Types Attributes.
The types attributes described below are those you can select in the Object Browser available from the Expert Rule Editor or the Expert Check Editor.
Types are allocated attributes that you can key in in the check or rule body or that you can select in the Language Browser.
- If you want to use the Object Browser:
-
From the Knowledge Expert Workbench, access the Expert Rule/Expert Check Editor.
-
Click
 or
or
 , create a rule or a check, then click
 in the Expert Rule or the
Expert Check Editor.
in the Expert Rule or the
Expert Check Editor. -
Click ... and enter the type name and click OK.
-
Click Close.
-
- If you want to manually key in the statement, use the following syntax:
type_identifier.object_name
Example:
if H.Diameter > 10.0 then H.Activity = False
![]()
Using Functions
Functions supported by Knowledge Expert may be entered manually in the check or rule body or can be selected from the Object Browser (See description above to know how to access the browser.)
Important:
|
![]()
Using Statements
You can use Statements.
Note: The control structures described below are the one you can use in the Expert Rule Editor or in the Expert Check Editor.
Any script is built out of a series of statements. A statement can be an assignment, a function call, or a conditional statement. Statements usually end with a semicolon. In addition, statements can be grouped into a statement-group by encapsulating a group of statements within curly braces.
You can use the single-line form (first syntax) for short, simple rules. However, the block form (second syntax) provides more structure and flexibility than the single-line form and is usually easier to read, maintain, and test.
The else and else if clauses are both optional. You can have as many else if statements as you want below a block if, but none can appear after the else clause. Block if statements can be nested that is, contained within one another.
If Construct
This construct allows for conditional execution of code fragments. Note that "if" constructs cannot be nested. if(Hole.HoleType == "Simple") { Hole.Diameter = 24mm; }
Note:
- and and or are supported in the KWE statements.
- To execute a statement if a certain condition is met, and a different statement if the condition is not met, create two different rules or checks. This is how to provide "else" functionality in other languages.
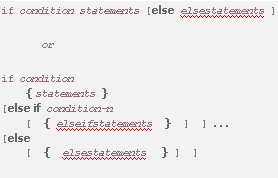
if condition statements [else elsestatements ]
or
if condition
{ statements }[else if condition-n
[ { elseifstatements } ] ] . . .[else
[ { elsestatements } ] ]Rules: if ... else ... else if
Conditionally executes a group of statements, depending on the value of an expression. You can use either block form syntaxes:
You can use the single-line form (first syntax) for short, simple rules. However, the block form (second syntax) provides more structure and flexibility than the single-line form and is usually easier to read, maintain, and test.
The else and else if clauses are both optional. You can have as many else if statements as you want below a block if, but none can appear after the else clause. Block if statements can be nested that is, contained within one another.
Checks
statement1 => statement2 (if statement1 then statement2) Displays a message (if type is Warning or Information) and turns to red in the specification tree each time statement2 is invalid as statement1 is fulfilled.
if ... then ... else Construct
Note that the if...then...else construct is only available for checks created using the Knowledge Advanced Language, and for rules. In this case, use the Knowledge Language. if then else statements are used for conditional computation. The else statement is optional. Statements can be nested that is, contained within one another. 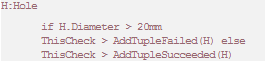
while Construct
Note that the while construct is only available for checks created using the Knowledge Advanced Language and for rules. In this case, use the Knowledge Language.
while loops are used to execute a statement if an expression evaluates to true.

for Construct
Note that the for construct is only available for checks created using the Knowledge Advanced Language and for rules. In this case, use the Knowledge Language.
for executes a loop based on the element of a list. See syntax opposite. It executes a statement Nth times where N is the number of elements of the list.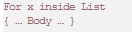
In the example above:
- x is a variable name (of a given type). It may represent an object or a value.
- List is a variable name of type List or an expression returning a list.
- x (like any other variable of the language) can be used in the body. It contains the Nth element of the list.
In the example below:
- x is a variable name of integer type. It is incremented at the end of each execution of the body.
- Predicate is a Boolean expression. The body is executed if this expression is true. This expression is evaluated before the body.
Note that the second for operator can lead to infinite loops.
![]()
Using Operators
You can use Operators.
Arithmetic operators
+ Addition operator (also concatenates strings)
- Subtraction operator
* Multiplication operator
/ Division operator
Comparison Operators
<> Not equal to
== Equal to
>= Greater or equal to
<= Less than or equal to
< Less than
> Greater than
Filter Operator
The Filter Operator (=>) is designed for implication: It enables you to restrict the check operation on a subset of the features that were specified in the For all field: