Click Geometric Trace  .
.
In the dialog box that appears, modify the name of the geometric
representation that will be created by the trace.
Click Finish.
The Geometric Trace dialog box appears.
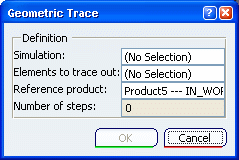
In the specification tree, select the scenario result you want to trace.
Select the elements (points, vertex, curves, or edges) in the model that you want to trace. These elements can be selected from any geometry (sketch, wireframe, solid and surface).
Optional:
Select the Reference product. The motion of the trace
will be relative to the motion of the reference product (see About Traces).
Click OK.
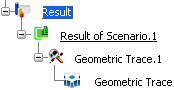
The trace opens in a new window. In the kinematics simulation window, Geometric Trace appears in the specification tree under the current scenario result.
In the following example, Geometric Trace.1 is the feature, and Geometric Trace is the link to the geometric representation of the trace:
To display an existing trace, right-click the trace representation in the specification tree, and select Display Representation.
The trace opens in a new window.
To update a trace, right-click the trace in the specification tree, and select Update.
The trace opens in a new window. In the kinematics simulation window, Geometric Trace is updated.