Defining a Dressup for a Mechanism

The dressup function provides the capability to create multiple rigid engineering connections at once. This is an easy way to relate 3D dressing components to each component of a conceptual mechanism (skeleton) so that they can move together during the kinematics simulation. You can create a mechanism's dressup based on rigid engineering connections to attach the components that belong to the model to the mechanism's components.


Before you begin: At least one mechanism representation must be created.
Related Topics
Setting Up a Mechanism
More about Dressup
  1. In the specification tree, select a mechanism.

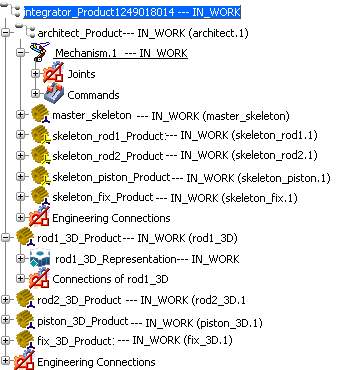
  2. Define the selected mechanism as current by right-clicking the mechanism in the specification tree, and selecting Set as current in the contextual menu. See Structural Analysis User's Guide: Defining a Structural Analysis Simulation: Defining a Current Object for more information.

    The current mechanism is underlined.

  3. Click Dressup .

    The Dressup dialog box appears.

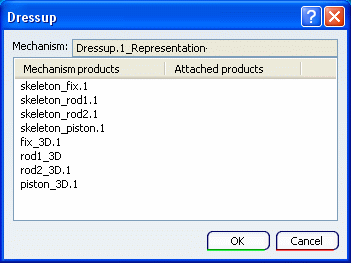
    The Dressup dialog box includes the following:


    • Mechanism: The selected mechanism; by default, the current mechanism.
    • Mechanism products: Lists the products that belong to the current mechanism. The products that are included in the mechanism are identified by a specific color-code in the 3D.
    • Attached products: Lists the products attached to the mechanism. Initially, this column is empty.

    Important: You can create only a single dressup for a mechanism.

  4. Select a product to which you want to attach a product in the model using the Mechanism products list.

    The product is highlighted in the specification tree and reframed in the 3D. All other products from the mechanism become transparent in the 3D.

  5. In the 3D or in the specification tree, select the product in the model to attach to the product from the Mechanism products list.

    Note: You can attach several products in the model to a product in the mechanism from the Mechanism products list.

    The selected product appears in the Attached products list, and both products are identified by the same color-code in the 3D.

  6. To detach a product:

    • First select the product in the mechanism in the Dressup dialog box (Mechanism products list), then deselect the attached product from the model in the 3D or in the specification tree.
    • Right-click a product and select Remove Link in the contextual menu.

    The product is removed from the Attached products list, and the dressup link is removed. The rigid engineering connection still appears under the Engineering Connections node.

  7. To delete the rigid engineering connections associated to the dressup:

    • First select the product in the mechanism in the Dressup dialog box (Mechanism products list), then deselect the attached product in the 3D.
    • In the Dressup dialog box, right-click a product and select Delete Joint in the contextual menu.

  8. Click OK.

A dressup node appears in the specification tree with rigid engineering connections below.

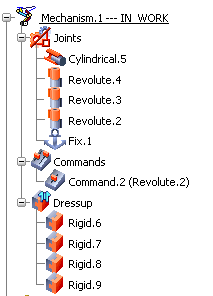
Important: A rigid engineering connection appears under the Dressup node as long as the attached product it connects does not become a mechanism product by activating new engineering connections in the Mechanism Manager.