A button  is available besides the Circle type to prevent an
automatic change of the type while selecting the geometry. Click it so that the button turns red is available besides the Circle type to prevent an
automatic change of the type while selecting the geometry. Click it so that the button turns red  meaning that the type is locked.
For instance, if you choose the Center and radius type, you are
not able to select a line as the center. May you want to select a line, choose
another type in the list. The status of this button is stored as the default value: therefore, if it is red and you launch the same command again or another command owning this button, the button will be red too. meaning that the type is locked.
For instance, if you choose the Center and radius type, you are
not able to select a line as the center. May you want to select a line, choose
another type in the list. The status of this button is stored as the default value: therefore, if it is red and you launch the same command again or another command owning this button, the button will be red too.
Create a Circle with a Center and a Radius
You can create a circle by defining center and radius.
Click Circle
 in the Wireframe toolbar (Circle-Conic sub-toolbar). in the Wireframe toolbar (Circle-Conic sub-toolbar).
The Circle Definition dialog box appears.
In the Circle type list, select the Center and radius circle type.
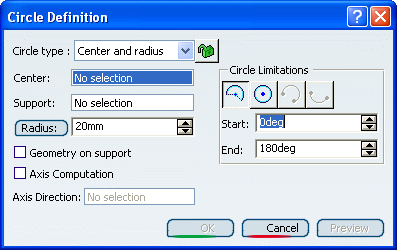
In the Center box, select a point as the center of the circle.
In the Support box, select the plane or surface where
the circle is to be created.
In the Radius box, type the value or use the arrows to change the value.
Depending on the active Circle Limitations icon,
the corresponding circle or circular arc is displayed.
For a circular arc, you can specify the Start and
End angles of the arc.
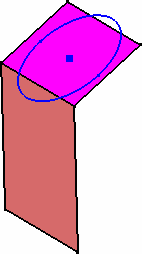
Click OK to create the circle or circular
arc.
The circle (identified as Circle.xxx) is added to the specification
tree.

Create a Circle with a Center and a Point
You can create a circle by defining a center and any point lying on the circle.
Click Circle
 . .
The Circle Definition dialog box appears.
In the Circle type list, select the Center and point circle type.
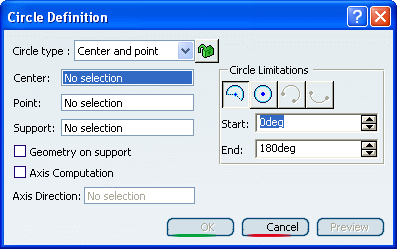
In the Center box,select a point as the center of the circle.
In the Point box, select a point through which the circle passes.
In the Support box, select the plane or surface where
the circle is to be created.
The circle, of which center is the first selected point
and passing through the second point or the projection of this
second point on the plane tangent to the surface at the first
point, is previewed.
Depending on the active Circle Limitations icon,
the corresponding circle or circular arc is displayed.
For a circular arc, you can specify the Start and
End angles of the arc.
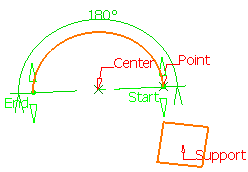
Click OK to create the circle or circular
arc.
The circle (identified as Circle.xxx) is added to the specification
tree.

Create a Circle with Two Points and a Radius
You can create a circle by defining any two points lying on the circle and the radius.
Click Circle
 . .
The Circle Definition dialog box appears.
In the Circle type list, select the Two points and radius circle type.
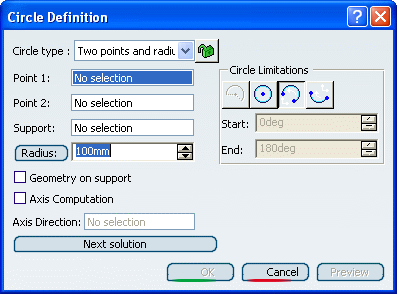
select two points on a surface or in the same plane.
In the Support box, select the plane or surface where
the circle is to be created..
In the Radius box, type the value or use the arrows to change the value.
The circle, passing through the first selected
point and the second point or the projection of this second
point on the plane tangent to the surface at the first point,
is previewed.
Depending on the active Circle Limitations icon,
the corresponding circle or circular arc is displayed.
For a circular arc, you can specify the trimmed or complementary
arc using the two selected points as end points.
You can use the Next Solution button, to display
the alternative arc.
With a plane as Support
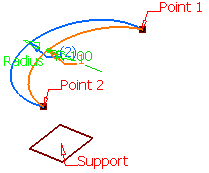
With a direction as Support (the computed plane is shown
in blue)
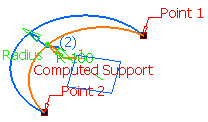
Click OK to create the circle or circular
arc.
The circle (identified as Circle.xxx) is added to the specification
tree.

Create a Circle with Three Points
You can define a circle by defining any three points lying on the circle.
Click Circle
 . .
The Circle Definition dialog box appears.
In the Circle type list, select the Three points circle type.
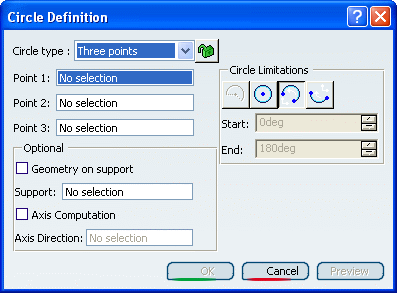
Select three points where the circle is to be created.
Depending on the active Circle Limitations icon,
the corresponding circle or circular arc is displayed.
For a circular arc, you can specify the trimmed or complementary
arc using the two of the selected points as end points.
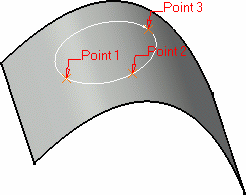
Click OK to create the circle or circular
arc.
The circle (identified as Circle.xxx) is added to the specification
tree.

Create a Circle with a Center and an Axis
You can create a circle by defining its center and axis.
Click Circle
 . .
The Circle Definition dialog box appears.
In the Circle type list, select the Center and axis circle type.
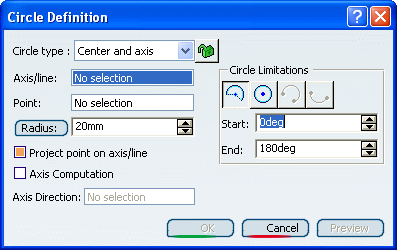
In the Axis/line box, select an axis or a line.
It can be any linear curve.
In the Point box, select a point.
In the Radius box, type the value or use the arrows to change the value.
Set the Project point on axis/line option:
-
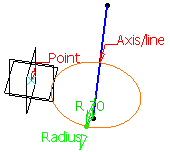
selected (with projection):
the circle is centered on the reference point and projected
onto the input axis/line and lies in the plane normal to
the axis/line passing through the reference point. The line
will be extended to get the projection if required.
-
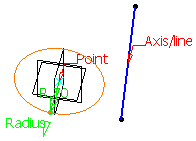
cleared (without projection):
the circle is centered on the reference point and lies in
the plane normal to the axis/line passing through the reference
point.
With projection
Without projection
Click OK to create the circle or circular
arc.
The circle (identified as Circle.xxx) is added to the specification
tree.

Create a Bitangent Circle (with Two Elements)
You can create a circle by selecting any two elements to which circle is to be tangent.
Click Circle
 . .
The Circle Definition dialog box appears.
In the Circle type list, select the Bitangent and radius circle type.
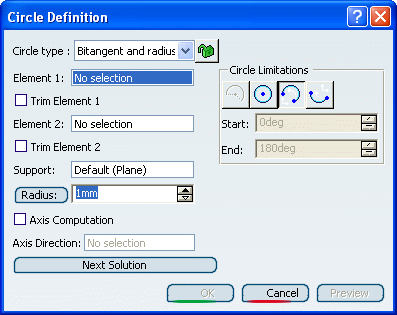
Select two elements (point or curve) to which
the circle is to be tangent.
In the Support box, select a surface.
Enter a Radius value.
Several solutions may be possible, so click in the region
where you want the circle to be.
Depending on the active Circle Limitations icon,
the corresponding circle or circular arc is displayed.
For a circular arc, you can specify the trimmed or complementary
arc using the two tangent points as end points.
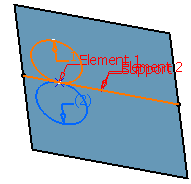
You can select the Trim Element
1 and Trim Element 2 options to trim the
first element or the second element, or both elements.
Here is an example with Element 1 trimmed.
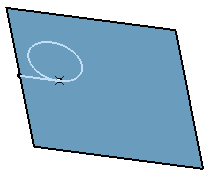
Click OK to create the circle or circular
arc.
The circle (identified as Circle.xxx) is added to the specification
tree.

Create a Bitangent Circle (with at least a Point)
You can create a circle by selecting any two elements and a point to which circle is to be tangent.
Click Circle
 . .
The Circle Definition dialog box appears.
In the Circle type list, select the Bitangent and point circle type.
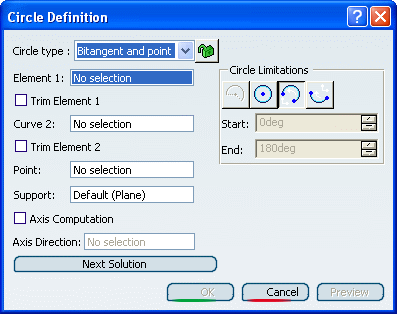
In the Element 1 box, select a point or a curve to which the circle is to
be tangent.
Select a second Curve and a Point on
this curve.
The point will be projected onto the curve.
In the Support box, select a plane or planar surface.
Several solutions may be possible, so click in the region
where you want the circle to be.
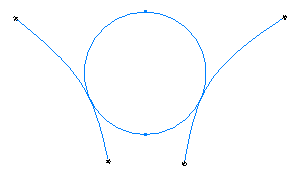
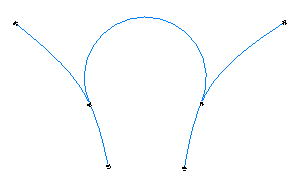
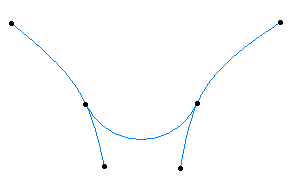
Depending on the active Circle Limitations icon,
the corresponding circle or circular arc is displayed.
Complete circle
Trimmed circle
Complementary trimmed circle
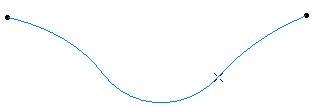
You can select the Trim Element
1 and Trim Element 2 check boxes to trim the
first element or the second element, or both elements.
Here is an example with both elements trimmed.
Click OK to create the circle or circular
arc.
The circle (identified as Circle.xxx) is added to the specification
tree.

Create a Tritangent Circle
You can create a circle by defining any three elements to which the circle is to be tangent.
Click Circle
 . .
The Circle Definition dialog box appears.
In the Circle type list, select the Tritangent circle type.
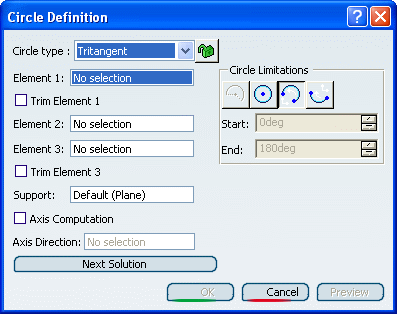
Select three Elements to which the circle
is to be tangent.
In the Support box, select a planar surface.
Several solutions may be possible, so select the arc of
circle that you wish to create.
Depending on the active Circle Limitations icon,
the corresponding circle or circular arc is displayed. The first
and third elements define where the relimitation ends.
For a circular arc, you can specify the trimmed or complementary
arc using the two tangent points as end points.
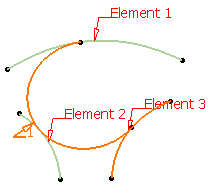
You can select the Trim Element
1 and Trim Element 3 check boxes to trim the
first element or the third element, or both elements.
Here is an example with Element 3 trimmed.
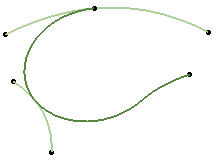
Click OK to create the circle or circular
arc.
The circle (identified as Circle.xxx) is added to the specification
tree.

Create a Circle with a Center Element and a Tangent Curve
You can create a circle by defining the center element and a tangent curve to the circle.
Click Circle
 . .
The Circle Definition dialog box appears.
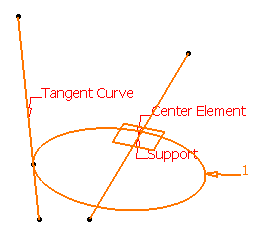
In the Circle type list, select the Center and tangent circle type.
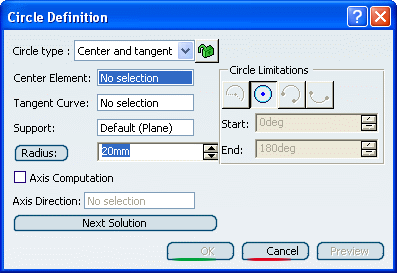
The circle center will be located either on the center
curve or point and will be tangent to the tangent curve.
Select a curve as the Center Element and
enter a Radius value,
or
Select a point as the Center Element.
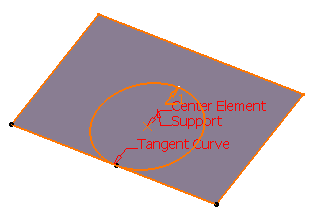
Select a Tangent Curve.
Click OK to create the circle or circular
arc.

Create a Circle Using the Diameter/Radius Options
You can switch the parameters from diameter to radius and vice-versa.
- Click Radius to switch to a Diameter value.
Conversely, click Diameter to switch back to the Radius value.
This option is available with the Center and radius,
Two point and radius, Bitangent and radius, Center
and tangent, and Center and axis circle types.
Note that the value does not change when switching from Radius
to Diameter and vice-versa.

Using the Axis Computation Option
You can automatically create axes to circle by selecting Axis Computation check box.
- Select the Axis Computation check box to
automatically create axes while creating or modifying a circle. Once
the option is selected, the Axis direction box is enabled.
-
If you do
not select a direction, an axis normal to the circle will be created.
-
If you select
a direction, two more axes features will be created: an axis aligned
with the reference direction and an axis normal to the reference
direction.
|
![]() is available besides the Circle type to prevent an
automatic change of the type while selecting the geometry. Click it so that the button turns red
is available besides the Circle type to prevent an
automatic change of the type while selecting the geometry. Click it so that the button turns red ![]() meaning that the type is locked.
For instance, if you choose the Center and radius type, you are
not able to select a line as the center. May you want to select a line, choose
another type in the list. The status of this button is stored as the default value: therefore, if it is red and you launch the same command again or another command owning this button, the button will be red too.
meaning that the type is locked.
For instance, if you choose the Center and radius type, you are
not able to select a line as the center. May you want to select a line, choose
another type in the list. The status of this button is stored as the default value: therefore, if it is red and you launch the same command again or another command owning this button, the button will be red too.![]()
![]()
![]()
![]()
![]()
![]()
![]()
![]()
![]()


