Creating Adaptive Swept Surfaces | |||||
|
| ||||
Create an Adaptive Swept Surface
You can create adaptive swept surface.
Click Adaptive Sweep
 in the Sweeps sub-toolbar.
The Adaptive Sweep Definition dialog box appears.
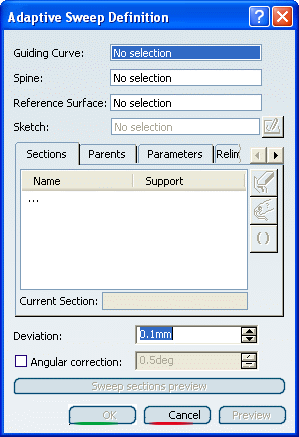
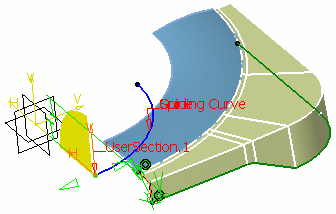
Select the Sketch to be swept along the guiding curve .
An axis-system is displayed defining the plane in which the first section is created.
Important: The axis system is positioned normal to the reference surface. Select the end point of the guiding curve to create another section.
The axis-system is displayed at this new section.
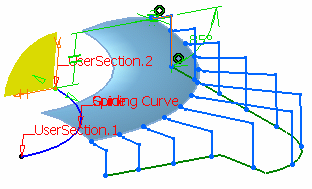
Click Sweep sections preview to have a quick wireframe preview of the adaptive sweep surface.
This option lets you see the evolution of the sketch along the guide curve.
Three contextual menu items are available on the manipulators:
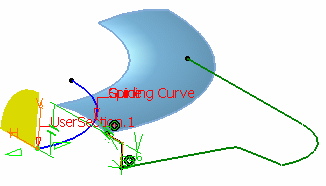
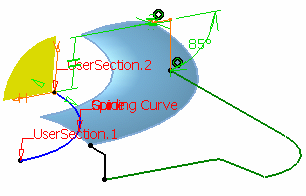
- Create a section here: lets you create a section at the manipulator's place. A new point is dropped on the guide curve with the corresponding ratio. If the guide curve is closed, the created point is a 3D coordinates point.
- Use interpolated manipulator: the interpolation value between the section parameters is computed. You can move the manipulator along the guide curve to visualize the parameters evolution.
- Show all sections' constraints: lets you visualize all the sections and their constraints at the same time.
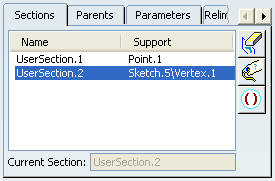
The list in the Sections tab is automatically updated with:
- the first section being at the intersection of the selected sketch and guiding curve
- the second section at the selected point on the guiding curve.
- Click
 or choose the
Remove Section contextual menu, to delete a section from
the swept surface. The first section cannot be deleted.
or choose the
Remove Section contextual menu, to delete a section from
the swept surface. The first section cannot be deleted. - Click
 or choose the Rename Section contextual
menu, to give a new - more explicit - name to any user section.
or choose the Rename Section contextual
menu, to give a new - more explicit - name to any user section. - Click
or choose the Activate Section / Deactivate Section
contextual menu, to respectively activate or deactivate
adaptive sweep sections.
Warning: When using this option, at least one section must be activated to compute the sweep, otherwise an error is displayed.
Click Preview.
Click the Parents tab to display the elements making up the sweep.

Tip: You can select one of the parents from the list and click  ,
or choose the Replaces Parent contextual item to choose a
new parent for the swept surface.
The
Parent box becomes current and is filled in with the parent
to be replaced. Contextual commands are available on this box.
,
or choose the Replaces Parent contextual item to choose a
new parent for the swept surface.
The
Parent box becomes current and is filled in with the parent
to be replaced. Contextual commands are available on this box.Click the Parameters tab to display and redefine the constraints on a given section.
Use the combo list to define the current section.
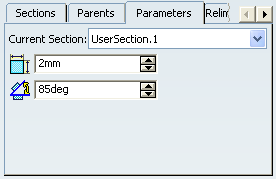
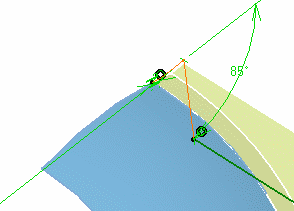
Change the constraint value to 5mm, and click Preview.
The modified sweep is previewed:
Click OK to create the swept surface.
The surface (identified as Adaptive sweep.xxx) is added to the specification tree.

![]()
Create or Select a Sketch
Once you have selected the guiding curve, you
can select an existing sketch or create one by clicking either
 or selecting the Create
Sketch contextual item on the Sketch box to start the
sketcher within the adaptive sweep context.
or selecting the Create
Sketch contextual item on the Sketch box to start the
sketcher within the adaptive sweep context.
In this case, the Sketch Creation for Adaptive Sweep dialog box is displayed, and allows you to define the construction elements for a new sketch in relation to existing geometry.
If needed, select construction elements (another guiding curve, support surfaces, and so forth).
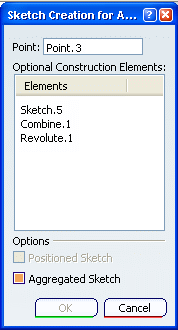
The selection in the geometry implies a global selection of the 3D elements.
Two options are available:
- Positioned Sketch: this option lets you position the created sketch according to the swept surface inputs. Therefore, if you modify the swept surface, the sketch is automatically updated.
Warning: It is available if a point is selected and if the point is on the guiding curve. - Aggregated Sketch: this option lets you aggregate the sketch under the swept surface feature in the specification tree.
Click OK.
The system automatically loads the Sketcher workbench, and provided the correct option is active, sets the sketch plane parallel to the screen. You can then define a new sketch.
Once you exit Sketcher by clicking
 ,
you return to the Adaptive Sweep command after the sketch selection,
as described above in step 5.
,
you return to the Adaptive Sweep command after the sketch selection,
as described above in step 5.This local definition of the sketch is particularly interesting as it allows to redefine the swept surface simply by editing the local sketch (add/remove construction elements, or constraints for instance).
Important: In this case, would you want to exit the Adaptive Sweep command, after having created the sketch using the Create Sketch contextual menu, yet retain the sketch itself, simply press the To cancel the command but keep the sketch button in the Adaptive Sweep Definition dialog box. 
Warning: You also have the possibility to create your sketch using the Sketcher workbench before entering the Adaptive Sweep command, although it is advised to create it directly in the context of the Adaptive Sweep command. In this case, when you select the 3D construction elements, please be careful to select them directly. Note: If you are a DS Passport customer, you can read the QA00000007443 article from the Knowledge Base for more information about sketch selection.
![]()
Relimit the Swept Surface
The Relimitation tab enables you to create a multi-sections swept surface using a closed guide. It lets you specify the relimitation type.
- Select the Relimit on start section to limit the swept
surface only on the start section or Relimit on end section
to limit the swept surface only on the start section, on both, or on
none.
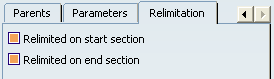
The swept surface can be closed if:
- the guide curve and spine are closed,
- curves created in the Sketcher are closed:
- when none of the options are selected: the swept surface is extrapolated up to the spine limits.
- when both options are selected: the swept surface is limited to corresponding sections
- when one or both options are cleared: the swept surface is swept along the spine: it is limited by the spine extremities or by the first guide extremity met along the spine.
Warning: You must deactivate both options to create a closed swept surface.