Instantiating Power Copies Using One Step Instantiation

You can instantiate power copies using One Step Instantiation once they have been created.


Before you begin: Open reference and destination documents.
Related Topics
Creating Power Copies
  1. From the reference document, click Instantiate From Selection .

  2. Select the power copy from the destination document.

    The Insert Object dialog box appears. Warning or error messages can be issued if the chosen destination is ambiguous or forbidden, for instance if you select an ordered geometrical set as the After destination.

    • In case of an error message, the destination field is emptied and the OK button is unavailable.
    • In case of a warning message, the power copy can still be instantiated but some elements may not be inserted in the chosen destination.

    Use the Reference list to choose the correct Power Copy when several have been defined in the document.

    The One step instantiation mode is automatically selected when working in a non ordered environment. If you work in an ordered environment, you can choose the mode.


  3. Select the Destination of the instantiation.

    It is composed of two elements: a combo list corresponding to the relative position (Inside or After) and a field containing the destination feature.

    The destination depends on the current feature as it is automatically filled with the latter. If there is no current feature, the field is empty.


    • When possible, you can modify the default destination, either by modifying the relative position or by selecting another destination feature.

    • The destination is filled with

      After when the destination is a geometric feature. In this case, the After field is grayed out.
    • The destination is filled with

      Inside when the destination is a geometrical feature set.

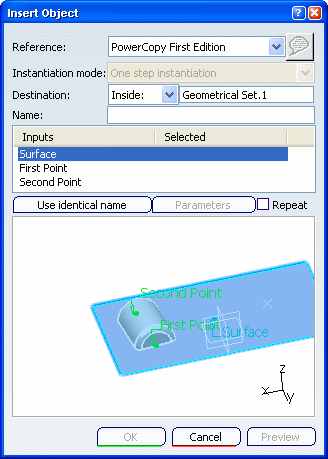
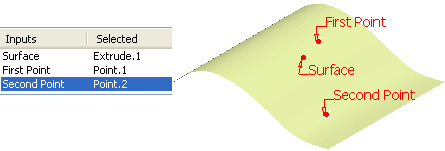
  4. Complete the Inputs within the dialog box by selecting the adequate element in the geometric area.

    After each selection, an indicator is displayed in the 3D area, with orientation when necessary. Click on the green arrow to reverse orientation if needed.

  5. If needed, click Use identical name to automatically select all the elements with the same name.

    Tip: This is especially useful when the input is the same one repeated several time.

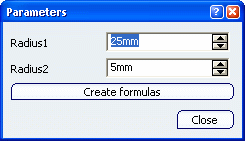
  6. You can also click Parameters to display the Parameters dialog box and modify values.

    Here we increased the Radius1 value to 25 mm.


  7. Click Create formulas to automatically create a formula for every parameters with the same name provided there are any.

  8. Click Close.

  9. Click OK to finish the instantiation.

    The Power Copy is instantiated in context, meaning its limits are automatically re-defined taking into account the elements on which it is instantiated.

Important:
  • You can select the Repeat check box to be able to repeat the instantiation. In this case, once you have clicked OK in the Insert Object dialog box, the latter remains open, the Power Copy's Inputs are listed and ready to be replaced by new inputs, as described above. Parameters modified using Parameters are retained for the next instantiation. To exit the command, you need to clear the Repeat check box or click Cancel.
  • The feature defined as the current object corresponds to the last instantiated component of the power copy.