Click Front View
 in the Views toolbar.
Open the 3D window.
The Apply a PLM filter
dialog box is displayed.
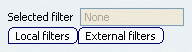
Click the appropriate button to specify where the filter
is located:
-
Local filters: lets you select a
filter that is already embedded in the product.
-
External filters: lets you select a filter
that has been propagated in the database.
Note that once it is embedded in the product, an external filter
becomes a local filter and can be re-used by selecting Local
filters.
A browse dialog box is displayed.
Browse to select the convenient filter,
then click OK
to close the dialog box.
Click OK to close the Apply a PLM filter
dialog box.
You can now proceed as usual to create the view.
From the product structure or from the specification
tree, select a plane or a surface plane.
The 2D window is automatically displayed.
Click in the sheet to select a location for your view.
The view is created
displaying the 3D elements filtered by the selected filter.
The selected filter gets duplicated and embedded in the root product with suffix "Drafting" added to it. A message is displayed confirming the action.
The created view has a link with the embedded filter.