Analyzing Fillets and Rounds of a 3D Shape | ||||
|
| |||
Detect Rounds and Fillets by Setting Single Radius Values
You can detect rounds and fillets by setting single radius values.
Click Part Analysis
 in the Part Design Feature Recognition toolbar.
The Part Analysis dialog box appears.
It is divided into two areas: the left one is dedicated to rounds analysis, the right one to fillets analysis.

You are going to detect the number of rounds and fillets which radius value is 8mm in your 3D shape. For that, first you need to add colorization rules . At the bottom of the Colorization rules frame, there is a rule you can define and then add. For the single value rule, keep the rule type option as Single.
To the left of Single, click the color combo box.
A list appears containing:
- a blank color box
- a list of default colors from the color palette, ready for use
- the More Colors... option
Click Add to validate and add the rule.
The Rounds frame now looks like this:
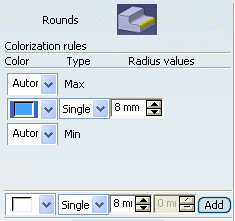
Note that:
The rules will be added in the order of sorting. So even if you change the radius value for the rule, it may get rearranged in the sorting order.
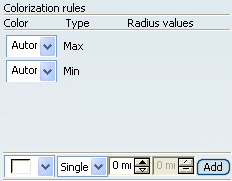
- The rule can be deactivated by setting its color as Automatic.
- All colorization rules and colors for other options are saved (only when you click OK to close the dialog box) and are restored when you launch the capability again.
Repeat the previous operations for fillets, just choose a distinct color to identify them. Red, for example.
The Fillets frame now looks like this:

Set the yellow color as the background color. This means that all the faces of the selected body that do not follow any rule are colored in yellow.

Click OK to close the informative window.
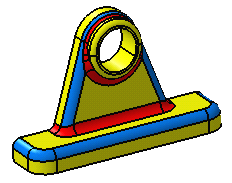
The result now appears. 8 rounds identified by the blue color and 5 fillets identified by the red color, which radius values are 8mm were recognized.

![]()
Detect Rounds and Fillets by Specifying Ranges of Radius Values
You can detect rounds and fillets by specifying ranges of radius values using the Range option in the Part Analysis dialog box.
The Part Analysis dialog box appears. You can notice that the values and colors defined in the previous steps are still displayed in the dialog box.
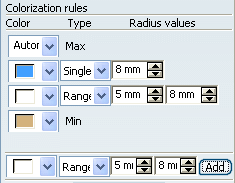
To colorize rounds (or fillets) as per range of radius value, you need to add colorization rules of the range type: to do this, you just need to set Range.
The second radius box is then activated as shown below:

Click Add to validate the rule.
The dialog box must look like this: