Exploding a Product

You can explode an assembled product (or subassembly) to separate the components to see their relationship in a 3D context. When you explode an assembly, the exploded view is kept when you exit the command.

To see the product structure in a 2D view, you can see the specification tree.

  1. Select the product or subassembly.

  2. Click Explode .

    The Explode dialog box is displayed.

  3. Set Depth to All levels (if not already set).

    The Depth parameter lets you choose between a totally (All levels) or partially (First level) exploded view.

  4. Set Type to 3D (if not already set).

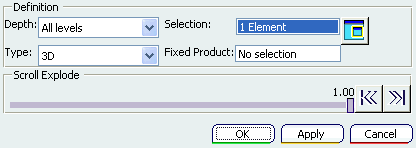
  5. Click Apply to perform the operation.

    The Scroll Explode field displays the progression of the operation. The application assigns directions and distances. Once complete, the assembly looks like this:


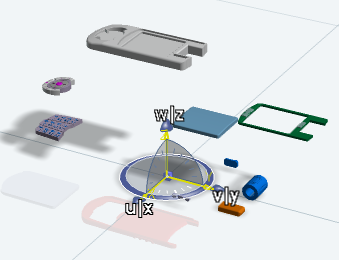
    This operation enables you to view all components separately.

  6. If you select , you go back to a product structure level.

    In this case, because All Levels was initially selected, you go back to a view of the geometry on the sub-entity level. In some cases, the sub-entities are only shown. You can easily move products within the exploded view using the 3D compass.

  7. Select OK to confirm the operation or select the Cancel button to restore the initial view.

    If you select the OK button, the following warning message is displayed:

    You are about to modify product positions. Are you sure?

    If you need to restore the initial view, select No in the Warning dialog box and Cancel in the Explode dialog box.