Direct Printing
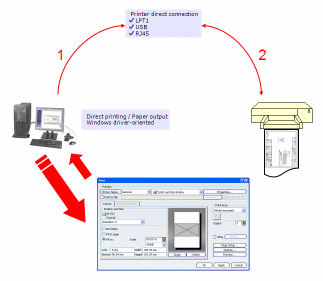
Direct (or "office") printing is the simplest scenario which aims
at directly printing the object.
Select .
The
Print dialog box opens to let you define the print settings to be applied when printing the object
Click OK to validate your settings.
The settings are transmitted to the printer driver which, in turn, send the
print job to the printer: the object is then printed on the output
(paper, vellum, polyester, etc.) you specified.


Asynchronous Printing
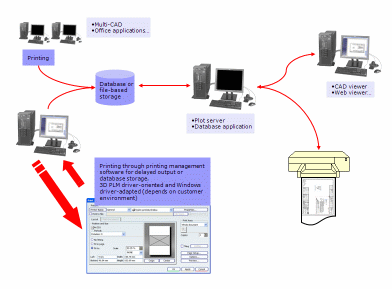
Asynchronous (or "virtual") printing lets you work in a more
complex environment because in that case, third-parties, a plot
server and distributed printers are involved.
Run a V6 session or a third-party (e.g. Multi-CAD).
Depending on what you are running: - From a V6 session, select then activate the Print to file check box to store the image
printout in a file in the location you specify
.
- From a third-party application, use the print
functionality to store the image printout in a file or in database.
The plot server or database application retrieves the file.
- The file containing the printout image is browsed in a viewer such
as a CAD or a Web viewer.
- Or, the file containing the printout image is sent to a printer.
Depending on the options you selected, either one or many objects
are printed.


Technical Illustration
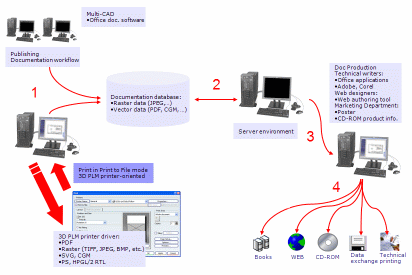
Technical illustration lets you generate objecs that will be
available on a wide variety of supports. This printing mode is also
a "virtual" printing mode since no direct printing is required, it
is a file format-oriented mode.
Run a V6 session or a third-party (e.g. Multi-CAD)
Depending on what you are running: - From a V6 session, open the file (SVG, JPEG, etc.) to be printed.
- From a third-party, use the print functionality to
store the image printout in a file or in the documentation
database.
If you are in a V6 session,
select then activate the Print to file
check box to store the image printout in the location you specify.
The server environment retrieves the document from the database.
The document is then transferred to people such as technical
writers or web designers who can work on the document as needed.
Finally, the document can be displayed on the world-wide web,
printed in books, stored on CD-ROMS, etc.

|
![]()
![]()


