Exporting Objects to Other Formats

You can save a new or existing object to a different format and in another location.


Before you begin: The list of available formats varies according to your working context and therefore, not all the formats available are displayed.

For more information about formats available for a specific object (i.e. product, 3D Shape, etc.), see the documentation of interest.

  1. Access the object to be exported.

  2. Select PLM Access > Export...

  3. In the Export To File dialog box, use the Save in list to select the save location:
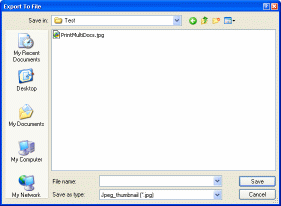


  4. In the Save as type list, select the format in which the object is to be saved from the list displayed.

  5. Enter the name of the exported object in the File name box if you want to create a new file or select an existing file, if any.

    If you select an already existing file, a message prompts you to confirm that you want to overwrite the existing file.

    Important: This dialog box lets you rename or delete the selected file by right-clicking then selecting Rename or Delete but note that:
    • After clicking Delete, click OK in the dialog box that appears to confirm the removal of the selected item.
    • When renaming a file, if the new name you entered is already used, the item is not renamed and a warning message is displayed.

  6. Click Save to save the object in the chosen format.

A message informs you that the object has been successfully exported.