Highlight the selected object(s) and select PLM Access > Export.
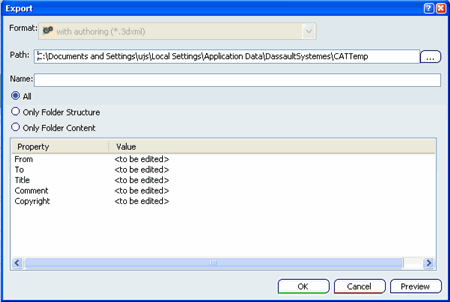
The Export dialog box appears.

Enter the Path and Name for the exported file. You may also browse for the directory using the browse button  .
.
In the Completion Options section, determine how much of your folder structure you want to export.

All - Exports the entire folder structure (root folder and all of its subfolders) and all the contents under the folder are exported.
Only Folder Structure - Exports the entire folder structure, but not the content.
Only Folder Content - Exports all the content under all subfolders but the folder structure is not exported.
In the Identification section you can provide some additional information to the receiver. To add information click on the <to be edited> text in any row.

This Id card can be viewed by the receiver before importing the file. You are not required to enter data. Each of these attributes can be filled in with any data you choose. If you do not enter any data, a blank is saved (the text "to be edited" is not saved). The data is embedded in the 3D XML file, therefore, after export, you cannot interactively edit the data.
Click Preview to see a list of the objects to be exported.
If one of the selected entities is not supported for export, none of the selections will be exported, and the 3D XML will not be generated.
Click OK to finish the export